Thứ Tư, 16 tháng 4, 2014

Protect Your Files in Windows 7 Using BitLocker To Go – Part 2

http://blog.pluralsight.com/windows-7-bitlocker-to-go
February 11, 2010  				

Protect Your Files in Windows 7 Using BitLocker To Go – Part 2

By

BitLocker To Go is the mobile version of BitLocker Drive Encryption that allows you to do essentially the same thing as BitLocker, but on mobile drives such as External Hard Drives, Flash Drives and Thumb Drives.

BitLocker To Go provides a powerful method of encrypting all of your mobile media and documents.

Using BitLocker To Go

Using BitLocker To Go is an extremely straightforward process, and provides powerful encryption in very little time. Just connect your mobile drive, type in your password, and enjoy.

Remember, while you must be on a premium version of Windows 7 (Ultimate of Enterprise) to encrypt BitLocker drives, you can use any version of Windows to unlock the drive, including older generations like Windows Vista and Windows XP.

When a mobile drive is encrypted with BitLocker To Go, it is accessible using a password chosen during setup. This works on all versions of Windows 7. On Windows Vista and XP, you can use the BitLocker To Go Viewer to unlock the drive and view files within.


Setting Up BitLocker To Go in Windows 7

Setting up BitLocker To Go is also a fairly simple process. Just connect your mobile drive, for example, a flash drive, right click, and choose Turn On BitLocker… — then follow the setup steps, choose your password, and encrypt the drive.

While encryption speed greatly depends on the speed of the drive, encryption should take about 30 seconds for a standard 2GB flash drive, depending on how much data is on the drive. You can also choose to automatically unlock the drive when logged into your Windows account.

An important step to remember when setting up your BitLocker To Go encryption is the Recovery Key. You will be prompted to save a recovery key on your hard drive. It is important not to forget this step.

If you ever forget your password, you can use this file to unlock your drive and gain access to your files again. You are offered the option of either saving this key, or printing it. I would recommend doing both just in case.


Configuring BitLocker To Go

While there isn't much in the front end in terms of configuring BitLocker To Go, there are some great functions when editing Local Group Policies that can help enterprise management and security. Here is an overview of the settings which you can configure from within the Local Group Policy Editor.

First, navigate to the following from within the Local Group Policy Editor:

Local Computer Policy -> Computer Configuration -> Administrative Templates -> Windows Components -> BitLocker Drive Encryption -> Removable Data Drives

  • Control use of BitLocker on removable drives — Choose to allow users the ability to apply or suspend protection on BitLocker drives.
  • Configure use of smart cards on removable data drives — Choose to make the use of smart cards a requirement.
  • Deny write access to removable drives not protected by BitLocker — This is a great security measure. For example, if someone tried to copy over contents to their own personal unencrypted drive.
  • Allow access to BitLocker-protected removable data drives from earlier versions of Windows.
  • Configure use of passwords for removable data drives — this configuration is also very useful. You can add an extra layer of security by configuring the complexity and minimum password length for BitLocker To Go drives being set up.
  • Choose how BitLocker-protected removable drives can be protected — This allows you to choose how a user will be allowed to recover locked drives if they forget their passwords. Disabling these may lock users out of their drives, but adds a powerful layer of security.


Turning Off BitLocker To Go

You can turn off or temporarily suspend BitLocker To Go as quickly as setting it up.

To temporarily suspend BitLocker To Go, visit your Control Panel, search for and go to the BitLocker Drive Encryption page and click Suspend protection and then choose Yes. Your drive will be temporarily open for all usage, unprotected until you follow the same steps to unsuspend it.

To turn off BitLocker To Go completely, visit the BitLocker Drive Encryption page in your Control Panel and choose Turn Off Bitlocker. You will be prompted to decrypt your drive, continue and your drive will be completely unencrypted and open. To secure your drive again, just track back and follow the steps outlined above.


The Downside of BitLocker To Go

The main problem with BitLocker To Go, is while it is a great encryption solution for Windows 7, older generations of Windows like Vista and XP can only view files using the BitLocker To Go Viewer, and cannot add or edit files on the encrypted drive. You must use the BitLocker To Go Viewer to copy files to your desktop before being allowed to edit them.

I don't completely understand why BitLocker To Go, a native Microsoft program, does not work with older generations of Windows. Other solutions such as the encryption applications that come with some thumb drives work across all versions of Windows. I can only hope that in the future, Microsoft provides more support for older versions of Windows, especially in BitLocker To Go, considering thumb drives are made to be moved between many different computer systems.

I feel that this feature should have come standard with BitLocker To Go. While this is definitely a downside for standard use across multiple systems that include older generations of Windows, those who are using Windows 7 exclusively will find BitLocker To Go a valuable asset to their system and drives data security.


Is BitLocker To Go Right For You?

BitLocker To Go is an awesome choice for encrypting your mobile drives, but not in all circumstances. Its ease of use and powerful protection makes this a great choice for enterprise users running the Windows 7 operating system on all drives they plan to use the drive on.

However, for those who are looking to use their drive on computers with varying operating systems including older generations of Windows, BitLocker To Go may not be right for you.

About the Author

is a computer technician with over 8 years of experience in the IT field. He has completed training in CompTIA A+, Network+, Computer Business Applications (Microsoft Specialist), Web Page Design and Graphic Design, and is working on completing his CompTIA A+ and CCNA certifications. Mike has experience working as a computer technician for two local school districts, as well as freelance computer repair work with AlisalTech.com, which Mike owns. Music is another one of Mike's callings. Using his technical experience, Mike promotes local musicians in Salinas California through his website SalinasRadio.com where local musicians and businesses can gain promotion to a worldwide audience.

Author's Website: http://alisaltech.com

Is it time to setup my own personal cloud instead of using Dropbox?

http://www.bit.com.au/Guide/365066,is-it-time-to-setup-my-own-personal-cloud-instead-of-using-dropbox.aspx

Is it time to setup my own personal cloud instead of using Dropbox?

With all the security concerns about the cloud and Dropbox, is it worth ditching Dropbox and setting up your own personal cloud?

Millions of people are putting their files into cloud storage so they can access them wherever they go, or as a backup. But at the same time, security concerns about cloud services like Dropbox continue, whether they be government spying, hackers, or weaknesses in security.

So it's interesting to see that many major brands of Network Attached Storage (NAS) boxes let you create your own "personal cloud" or "private cloud". In particular, Western Digital launched its My Cloud personal storage by asking the question "Who wants to keep their precious content in some mysterious location?"

Similarly, Seagate has teamed with Tappit to offer a similar service with some of their NAS units and DLink has the mydlink portal for remotely accessing documents stored on NAS devices.

While many of these services are pitched at home use, the advertising sometimes shows them being used for business - for example, opening a presentation when you're out of the office

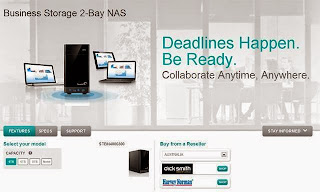
Seagate says that the Seagate Business Storage NAS lets you create a "private cloud", with an "easy ten minute setup". According to the web site, "It helps protect your business-critical data and centralizes your files in a single location you can access from anywhere."

Cloud storage is really pooled storage in a central location that can be accessed across the Internet from almost any device. In theory, it's not really all that difficult from a technical point of view.

So are these private/personal clouds all they're cracked up to be, and is it worth setting one up for your files?

We decided to put one of the market leaders in storage to the test. We set up a Seagate Business Storage 4-bay NAS equipped with four 4TB drives configured in a RAID5 configuration. This gave us about 12TB of usable space with redundancy in case a drive fails. It took us about an hour to get everything up and running with a laptop, smartphone and tablet all accessing the device with different user accounts.

Each separate user we created had access to a private folder and a shared folder that everyone could access. This gave us a similar set up to many small businesses.

What can my private cloud do?

The best way to consider what a private cloud solution can achieve is to compare it with some of the more popular services that are already out there such as Dropbox, Google Drive and Microsoft SkyDrive. These three services allow you, while you are working on your computer, to store files in a specific location. When you switch to another computer, smartphone or tablet you can access the same files with all the changes automatically synchronised.

What about a private cloud? With Seagate's Global Access feature you can save files to a shared folder on the NAS. You can access those files over the Internet wherever you go, just like Dropbox, but unlike Dropbox, this system won't automatically keep up-to-date copies of those files on your computers as it doesn't do file syncing. It's like a file server - unless you're connected to it, you can't access the files. If you sit down at your laptop to do some work in a hotel room and you aren't online, you won't have access to the files. With Dropbox, often you will already have a copy of the file on your laptop (although on a phone, Dropbox only downloads a file when you want to view that file).

There is something to be aware of. To use this personal cloud feature to access your files remotely, you'll most likely need to do some more complex configuration on your network router. For example, you'll need to change router settings to allow remote access to the shared folder. This might mean editing firewall rules, routing rules for incoming connections or putting the NAS in a demilitarised zone – a part of your network that sits outside the secure "inner sanctum" that's protected by your router's firewall. In that regard, the established public cloud services like Dropbox are far easier to use.

There is also an app so you can access the files in your private cloud using your phone or tablet.  We found this was very easy. We did this using an iPhone and an iPad and there is also an app for Android phones. Keep in mind it's not easy to edit any files on a phone or tablet this way - whether you are using Dropbox or Seagate's app. That's because the iPhone and iPad don't make it easy to open files stored remotely in locally installed apps.

If you need to upload files to your private cloud, you can do this using a web browser on your laptop, or the phone app. All we needed to do was go to https://seagate.tappin.com/ and enter the email address and password used to create our Global Access account. We could then upload files to our personal or shared folders.

So does your own private cloud have the same remote access capabilities as the likes of Microsoft SkyDrive, Dropbox and Google Drive? In our view it gets close, but lacks some of the polish. If Seagate included a utility that allowed us to sync a local folder on our laptop to the NAS automatically, then it would be a much closer match to the leading cloud storage services.

How much does this cost?
A NAS device can cost you hundreds of dollars, but the big advantage is that you can have a lot of storage this way.

For example, the Seagate Business Storage 4-Bay 16TB NAS we tested has a street price of around $1,700 (the recommended retail price is closer to $2,250). You don't have to spend this much - you could spend around $700 on a 4TB unit. Other NAS devices start at just a couple of hundred dollars but you then need to add hard drives to that cost (some NAS boxes don't come with the drives included).

Adding storage to a NAS is relatively easy and, in most cases, can be done without even turning the NAS off. For example, if you start with a four 1TB drives you can remove one of the drives and replace it with a 2TB drive. Once the RAID updates itself with the new drive  (this is an automatic process) you can then remove another 1TB and replace it with a 2TB drive. You repeat this until all of the disks are replaced. You need to do this one drive at a time so that all your data is safely updated to the new drives.

If your business is growing and you're likely to have more than a couple of users, then a NAS starts to get more attractive because you can add lots more storage (as long as you have enough drive bays).

In contrast, the likes of Dropbox and others give you between 2GB and 15GB of storage at no charge. In the case of Dropbox, you can increase this substantially by referring friends to the service.

The NAS sounds expensive by comparison, but the costs can add up quickly with cloud-based services like Dropbox once you need more data storage. For example, Dropbox charges businesses $795 per year for 5 users and $125 for each additional user per year. This gives unlimited storage capacity.

Although that may sound attractive, it's worth considering how you might move large volumes of data to that online facility. If you want to store large files that are many hundreds of megabytes in size, such as video or images, then your Internet connection's upload capacity might be a problem. When it comes to storing your files on a NAS that sits in your building, you're only limited by the speed of your internal network, not your Internet connection.

What about accessing the files? If you're in the same building, you don't have to be connected to the Internet to access your files - the box is in your building. That means you avoid the risk of your cloud provider going offline for some reason. Mind you, if you're accessing your files remotely, you won't be able to if your Internet connection connecting the NAS box to the outside world goes down.

Is this easy or hard to do?

How tricky is it to make this sort of system work? The good news is that NAS manufacturers have, over the years, made huge leaps forward when it comes to making it easier to set up their devices and access advanced features. But it does require some background knowledge and understanding of the terminology they use.

The key terms you need to get your head around are

Volume: a storage area on the NAS. In our case, the Seagate Business Storage NAS we used had four hard drives installed. These were set up to look like one large drive or volume.

Share: A folder created on the volume that we would assign specific access to. In our system, we had a public share that anyone on our network could access and private shares that could only be accessed by specific users.

User: This is a really an account (a combination of a username and password) that could access a share. You can also create groups that are collections of users. This makes it easy to assign access to a share as you can assign a group permission to access a share without having to enter lots of users.

When you set up a NAS, you create the volume first, the shares next and then the users. You then assign users their access to the shares.

Once you get your head around this, the actual set up process is reasonably easy.

Configuring the private cloud access will depend on the NAS you've chosen. With the Seagate unit I used, I needed to enable the Global Access option and then decide which users would be allowed to use the service.

This was easy – far easier than other NAS systems I've used in the past where none of this process was automated.

In my view, you will need to set some time aside and plan what you're going to do. But you don't need to be a network engineer or technical guru to make this work.

How secure is this?

When you're considering whether or not to make your data accessible when you're out of the office, the first thing we think you need to consider is the risk and reward. Whenever you make data accessible outside your network you open up a potential risk - whether it's via your own personal cloud, or a public cloud service. Even large service providers like Amazon, Dropbox and Sony have seen data that they thought was secured, accessed by unauthorised parties.

We want to make this very clear - there are security risks to your data with both approaches. Weigh up this risk against the benefits of making your data accessible (assuming you take all possible security precautions). For example, if you travel, then being able to easily access your documents from a tablet or smartphone could be useful.

With Seagate's private cloud there are two ways your data is protected:

  • The drive is encrypted, so if someone steals drive they can't read the data.
  • An SSL certificate is used to encrypt the data when you're accessing it remotely.

We found that by default, the data stored in a share on the Seagate NAS we used was not encrypted but it could be by ticking a checkbox in the configuration screen. If you're going to share or access data online we'd strongly recommend turning encryption on.

Also note that we'd recommend against using public hotspots for accessing critical, private data. Most public hotspots offer no security - all of the data sent and received over the public hotspot is in the clear and can be easily intercepted.

Also remember, like any online service, your security is only as strong as your weakest password. Make sure that every user's password is strong. Some good rules of thumb for creating a strong password are:

            •           use a combination of uppercase and lower case letters

            •           include some numbers

            •           include symbols such as punctuation

            •           don't use a word from the dictionary as the basis of your password

Dropbox, on the other hand, offers 256-bit AES encryption to store your data. SSL is used to create a secure tunnel for data transfers. In that sense, it offer similar security to the Seagate NAS we tested.

Also remember there are several dimensions to consider when thinking about security. The most obvious is whether an unwanted party can access your data remotely without you knowing. But there's also the risk of not being able to access your data when you most need it.

Almost every major cloud storage provider has suffered an unscheduled outage or technical fault that has resulted in either a potential security breach or a loss of access to data for customers. Just because some of these businesses are large and well resource it doesn't mean they are immune from outages and human error.

Also keep in mind the security implications of sharing sensitive data online. This introduces all sorts of risks, whether it's people sharing files with people they shouldn't, or accidentally sharing a file without realising it contains sensitive information. Read this article for more on this.

Is this personal cloud giving me offsite backup, or not?

A good backup strategy has at least one copy of your important data stored offsite – away from your main workplace. So, does creating your own cloud give you this?

In a word – no.

Creating a private cloud solution using your NAS offers the ability to remotely access your files wherever you are. But it doesn't reduce the risk of a disaster that might happen in the building where the NAS is kept. If you're looking at using a NAS as part of your back up arrangement, I'd suggest making an agreement with a friend to house an offsite backup for each other.

It could work like this. You both purchase NAS units and agree to host them for each other. That way, you both get the benefit of offsite backup and remote file access.

This is also where the established cloud-based storage services can still be useful.

Dropbox, for example, lets you easily retrieve past versions of your files. If you accidentally delete or overwrite a file, you can restore a previous version of the file. If you use the free version of Dropbox, you can retrieve up to 30 days of file history and there is no limit on what can be retrieved if you have a paid Dropbox account.

One of the benefits that a public cloud service like Dropbox offers is that your files are saved offsite. Although there are some risks and considerations that you need to consider when your data is held offshore, it's something to keep in mind.

Is this actually worth doing?

Given the effort required, the need for some technical know-how and how easy it is to use services like Dropbox, it's not easy to justify setting up your own private cloud solution.

Services like Dropbox, Google Drive and Microsoft SkyDrive are built upon millions of dollars of infrastructure by experts in storage, networking and security. Very few businesses are able to put those sorts of resources together to create that sort of service.

Let's look at a few of the key functions I'd expect from a cloud storage solution and see if a personal cloud using a NAS stacks up.

File Syncing

Being able to shift from a laptop to a desktop to a tablet and see a consistent view that's up to date of all my files is critical. The big, public cloud storage solutions all do this. Working with a NAS requires that I install another tool that synchronises my files from a folder on my computer to the NAS (Is this some capability/way of doing it you haven't mentioned earlier? Up till now I've been reading this as "syncing not possible"). It's not impossible but it means more fiddling.

Offsite Backups

Unless I keep my NAS at a friend or colleague's place, creating a private storage cloud doesn't satisfy my business need to keep critical data offsite.

Security

This is a hard question to answer. On one hand, there's a big psychological factor that comes from being able to see where my data is stored. Having my data close by also means I don't have to worry about the implications of data privacy laws about storing data overseas and whether an overseas authority can access my data (the PATRIOT Act gives some very wide-reaching powers to authorities in the United States for example).

However, data that is remotely accessed ought to be encrypted when stored and accessed. The Seagate Business Storage NAS we tested allowed us to encrypt both the contents of the device's hard drives and the data communications. While this was not hard to do, it was another set of steps.

Turning on encryption for the storage was simply a matter of ticking a checkbox but encrypting communications required the creation of an encryption key. It wasn't difficult but it was yet another thing we needed to do, and would ultimately need to maintain.

Cost

Cloud storage is very cheap. We can now access enough capacity to store thousands of documents or images. Even though the free version of Dropbox delivers just 2GB that's enough for thousands of files. For example, I work for several clients where I provide documentation and images. I can hold more than a year's data in the free storage. If I need more, I can pay for more capacity as I need it without the need to spend hundreds of dollars in equipment.  In other words, there's no need to engage in a round of significant capital investment.

On the other hand, a decent NAS with capacity for four drives, so that you can configure it with some hardware redundancy, will cost several hundreds of dollars just to get started. And then you have to factor in the time it takes to set it up, maintain it and operate it.

When I weigh up those factors, it's hard to justify the cost of a NAS if I'm looking to it as an alternative to cloud-based storage. 

Conclusion

We started this article by assuming that you have weighed up factors like security and you have decided you do want remote access to your files. So, if that's the case, is it worth setting up a personal cloud?

Personally, I can't see why I would use a NAS as an alternative to public cloud-based storage for my business. Dropbox, Google Drive and Microsoft SkyDrive make it very easy and their costs are very manageable.

As we said, there are risks with public cloud solutions, and there are also risks doing it yourself with a NAS like the Seagate Business Storage. With Dropbox, experts in storage security handle all of the security settings automatically. With the NAS, you need to configure and maintain the security yourself. Cloud services keep a copy of your data offsite, whereas with a NAS your data is stored in your building which could be a less physically secure environment (unless you organise to keep another copy offsite).

Where a NAS such as Seagate's Business Storage excels is in giving you lots of local storage capacity that can be locally accessed and, assuming you've enabled at the security settings correctly, the ability to remotely access your files from a wide variety of devices. If you need lots of local storage, then this could be the way to go. But if all you want is remote data access, we'd suggest that public cloud services make file syncing to multiple devices easier than with a NAS.

As we've already flagged this is a big topic, so we'll have more coverage on this. If you have questions or comments they're more than welcome - let us know what followup articles you wat us to do by adding your comments below.

Thủy thủ chiến hạm Mỹ ở Biển Đen “sợ hãi” Su-24 Nga

http://kienthuc.net.vn/the-gioi/thuy-thu-chien-ham-my-o-bien-den-so-hai-su24-nga-331738.html

Thủy thủ chiến hạm Mỹ ở Biển Đen "sợ hãi" Su-24 Nga

(Kienthuc.net.vn) - 27 thủy thủ tàu khu trục USS Donald Cook đang triển khai ở Biển Đen đã xin thôi việc vì lo sợ máy bay chiến đấu Nga.
Báo Độc Lập dẫn nguồn tin Reuters cho biết, việc máy bay ném bom không quân Nga nhiều lần tiếp cận tàu khu trục USS Donald Cook trong khu vực Biển Đen khiến thủy thủ Mỹ lo ngại và buộc họ phải viết báo cáo xin thôi việc.
Theo phát ngôn viên của Lầu Năm Góc Stephen Warren, hôm thứ 7 (12/4), máy bay ném bom Su-24 của Nga đã nhiều lần bay gần tàu khu trục của Hải quân Mỹ USS Donald Cook ở Biển Đen, mô phỏng cuộc tấn công chiến đấu.
 Tàu khu trục USS Donald Cook (DDG 75) trang bị hệ thống Aegis và kho vũ khí cực mạnh gồm tên lửa Tomahawk.
"Các thành viên thủy thủ đoàn đã phải gặp nhà tâm lý học sau khi bị căng thẳng, và đã có 27 thuyền viên của tàu khu trục nộp đơn từ chức. Bình luận về hành động này, họ nói rằng không có ý định mạo hiểm với tính mạng của mình", người phát ngôn cho biết.
Tàu khu trục USS Donald Cook vào Biển Đen ngày 10/4, theo công ước hàng hải quốc tế tàu Mỹ không thể ở Biển Đen quá 14 ngày. Nếu quá thời gian này cho phép, Nga có quyền hợp pháp để thực hiện cuộc tấn công tên lửa và phá hủy dữ liệu của tàu mà không tuyên chiến với Mỹ.
Sukhoi Su-24 là máy bay cường kích cánh cụp cánh xòe được thiết kế chế tạo và đưa vào phục vụ từ những năm 1970. Trên chiếc máy bay này được trang bị kho vũ khí đủ sức vô hiệu hóa tàu chiến Mỹ bằng tên lửa chống tàu siêu thanh, bom có điều khiển.

Thứ Ba, 15 tháng 4, 2014

Phòng dịch sởi bằng hạt mùi và cây thuốc nam

http://kienthuc.net.vn/me-be/phong-dich-soi-bang-hat-mui-va-cay-thuoc-nam-331318.html?p=1

Để ngừa con không bị lây bệnh sởi thì thời điểm này tốt nhất các mẹ nên cách ly con tuyệt đối với môi trường có nhiều nguy cơ nhiễm bệnh.


Tránh cho bé tới nơi tụ tập đông người, vệ sinh sạch sẽ cho bé, vệ sinh cá nhân thay quần áo ngay khi bạn tới nơi có người nhiễm bệnh để ngừa lây sởi cho con. Ngoài ra bạn có thể mua các loại hạt mùi già, hoặc dùng một số loại lá cây bài thuốc đông y để tắm, cho con uống giúp ngừa và trị sởi.


Lấy một nắm nhỏ hạt và lá mùi già cho vào 3 gáo nước đun sôi để gần nguội tắm cho trẻ. Trước khi tắm, nên cho trẻ uống một thìa nước mùi.


Cứ cách nửa tháng lại tắm một lần. Cách này có thể đề phòng được bệnh sởi phát sinh, lại sạch và thơm. Nếu cẩn thận thì quần áo của các cháu cũng thỉnh thoảng cho vào nồi nước mùi già để đun sôi.


Củ sắn dây một miếng to bằng hai bao diêm (gọt vỏ thái mỏng), cánh bèo cái lấy độ năm cây (vặt bỏ rễ), kinh giới 10 ngọn (khô hoặc tươi, nếu có hoa càng tốt). Cả ba thứ trên cho vào với nửa bát nước, đun sôi kỹ, gạn ra còn âm ấm cho uống rồi đắp chăn cho kín gió. Đây là liều lượng thuốc của các cháu từ 1-3 tuổi.


Nếu trẻ lớn hơn thì tăng số lượng lên gấp hai; nếu dưới một tuổi thì chỉ cho uống một nửa số lượng trên. Mỗi ngày sắc một thang cho uống. Uống hai ngày liền, sởi mọc ra đều thì thôi.


Lấy 5-6 lá cây hoa nhài, hoặc lấy một cái nấm hương, cho vào một chén nước, đun sôi kỹ, để gần nguội cho trẻ uống


Cây cỏ mực còn gọi là cây nhọ nồi sử dụng toàn thân cây, lá, hoa: 50 g lá, hoa sầu đông, 50 búp ổi và hoa vừa rụng đài hoa. Tất cả nấu với 200 ml nước (3 chén) còn 1 chén. Cho trẻ uống sáng (sau lúc ăn) và chiều (trước lúc ngủ). Sau 2 – 3 ngày sẽ lộ ban, hết sởi.


50 g cành, lá sim vừa già, còn tươi, rửa sạch, cắt khúc dài 3 cm,vàng hạ thổ, 100 g trái sim tươi (nếu không có sim tươi thì đổi bằng 30g trái sim khô), 50 g rễ mua thấp. Tất cả cho vào siêu sắc thuốc, đổ ngập nước, thêm vào 1/2 muỗng muối và 3 g gừng già. Bài thuốc có thể dùng chữa trị cho trẻ từ 1 – 10 tuổi chóng dứt sốt, lộ ban sởi, ăn uống, bú sữa trở lại bình thường.


Hạt lá tía tô 30 g; sắn dây 25 g; kinh giới, mạch môn mỗi thứ 20 g; cam thảo 5 g. Tất cả sấy khô, tán bột mịn đóng gói 3 g. Trẻ em một tuổi uống ngày hai gói, 3 tuổi uống ngày 4 gói, 5 tuổi uống ngày 6 gói: Hãm thuốc với nước sôi lọc trong hoặc uống cả bã.


Thuốc chỉ dùng trong 3 ngày, chỉ uống giai đoạn đầu, khi sởi đã mọc đều hoặc trẻ bị
tiêu chảy thì không nên uống.


Lá sầu đông hay sầu đâu chọn lá tươi khoảng 100 g, sau khi hái xuống thì rửa sạch, vò nát với ít muối. Pha với 5 lít nước đun sôi để nguội rồi tắm cho trẻ. Sau vài ngày, khi các vết ban sởi trên người trẻ lặn thì ngừng tắm.


Thứ Hai, 14 tháng 4, 2014

New Features of CA ERwin® Data Modeler r8

http://www.dwh-club.com/dwh-bi-articles/new-features-ca-erwin-data-modeler-r8.html

New Features of CA ERwin® Data Modeler r8

Author(s): 
Bralgin, Igor


Disclaimer
.
This article is not an official CA Technologies material. Use this article to first look briefly at features and changes which were made in ERwin 8r. Use the CA ERwin Data Modeler Help system to get the detail official information.

New Features of CA ERwin® Data Modeler r8

On 2011 year, CA Technologies launched new r8 version of its well-known modeling product family. This product bunch includes CA ERwin Data Modeler, CA ERwin Data Model Validator, CA ERwin Data Profiler, and CA ERwin Data Modeler Saphir Option for ERP. With the exception of ERwin 8r, all other products of the 8r line are not described in this article.

There are a number of distinct editions of CA ERwin Data Modeler 8r: Community Edition, Navigator Edition, Standard Edition, and Workgroup Edition.

CA ERwin Data Modeler r8 has many new features and enhancements applied to functionality and the user interface. This article briefly reviews new features of CA ERwin® Data Modeler r8.

There are the several following novelties and enhancements in ERWin of version 8r:

  • Bulk Editor and Bulk Editor Wizard
  • Support of Newest Database Management System Versions
  • Crystal Reports
  • Subject Areas
  • Auto Hide Feature
  • Toolbars
  • Panes
  • Text Editor and Spell Checker
  • Auto-layout options
  • Property Editors' Enhancements
  • Link objects and Link Wizard
  • New Zoom Tool and Overview pane
  • Go To Functionality
  • Annotation and drawing objects
  • Object's Hint
  • Diagram Picture
  • Model Themes
  • History and Notes

Bulk Editor and Bulk Editor Wizard

The Bulk Editor is one of the new features of CA Erwin Data Modeler 8r. Using the Bulk Editor can be extremely useful in case of a need to review and edit numbers of model objects' properties. For example, imagine all model entities and all tables do not have definition attributes and the goal is to add definitions for each entity and each table. Instead of opening serially the property window for each object, we can perform bulk editing of definitions for all these objects in the Bulk Editor. Also, another advantage is that Bulk Editor allows us to work with properties and objects without installing ERwin. Suppose some of the employees do not have ERwin installed on their computers, and these employees want to participate in reviewing and editing a data model. The Bulk Editor is the solution for both situations. Let us briefly review how we can provide model's information and perform bulk editing in these cases.

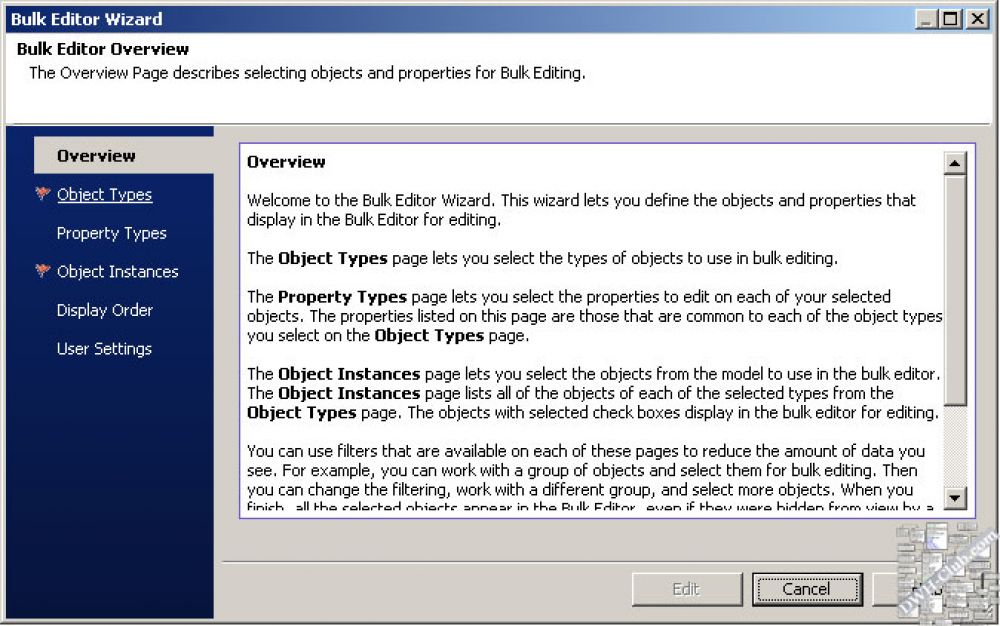
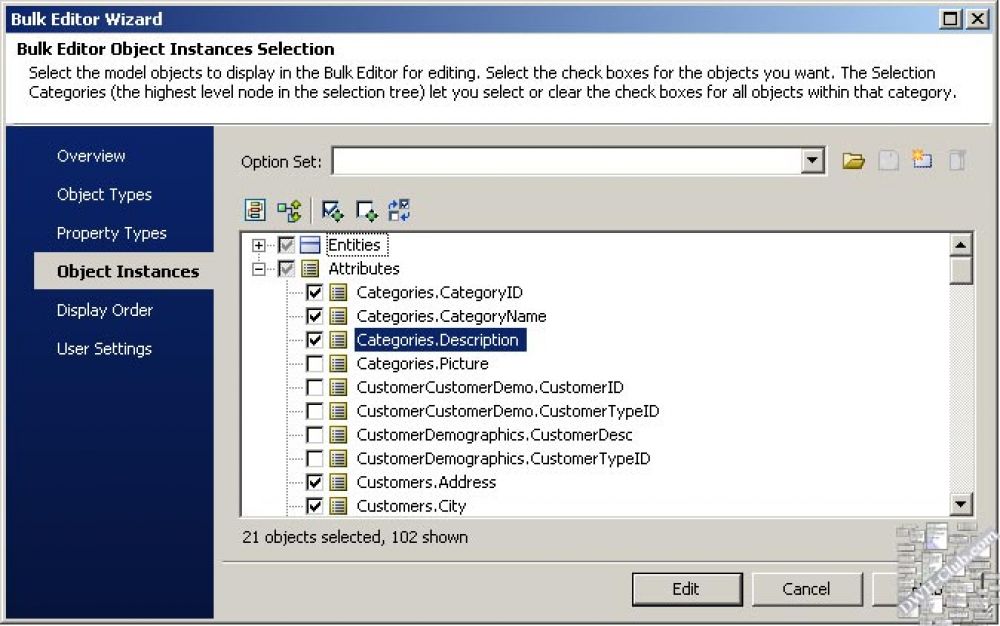
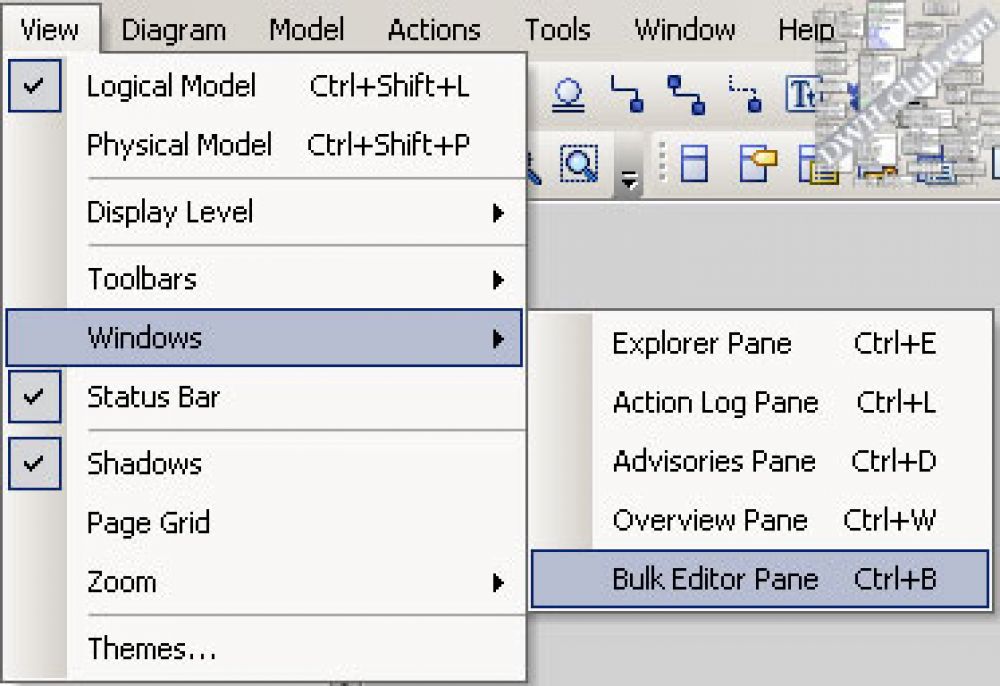
First of all, to display the Bulk Editor pane within the work area of CA Erwin Data Modeler, choose Windows menu item on the View menu and click Bulk Editor Pane item. Likewise all other panes of Erwin Data Modeler 8r, the Bulk Editor can be resized, rearranged, hided or floated within the application. Because the Bulk Editor is empty the first time we open it, click the Bulk Editor Wizard icon  on the pane toolbar. The Bulk Editor Wizard is opened, and we can select objects and properties which are should be reviewed and edited.

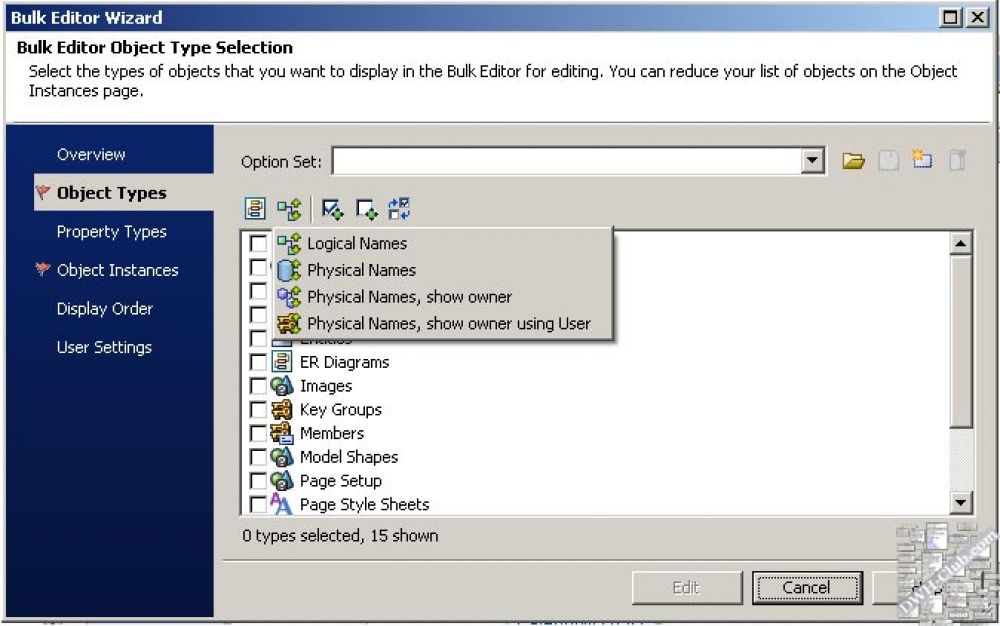
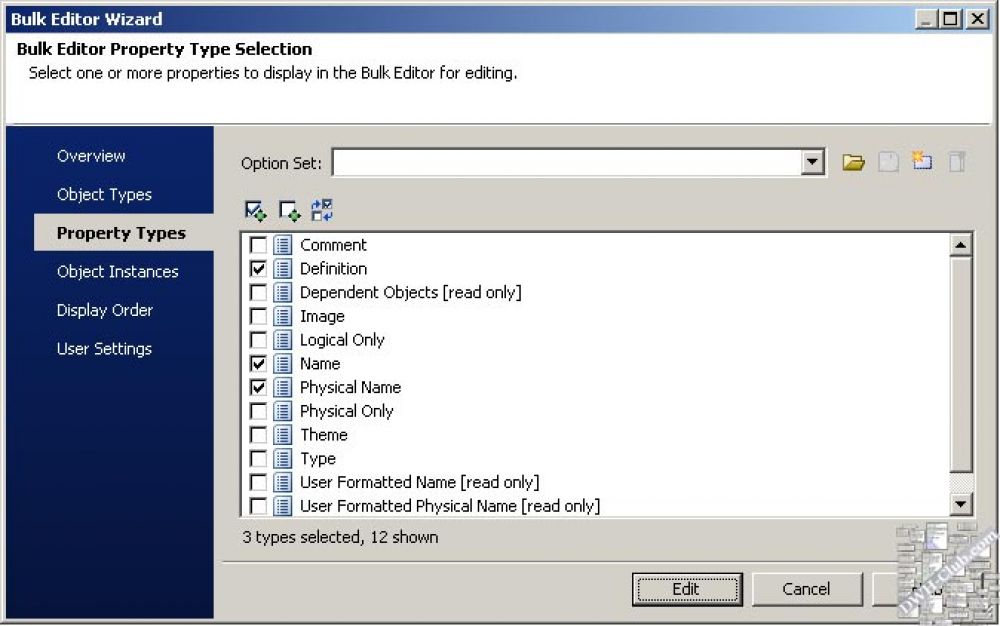
The Bulk Editor Wizard contains the following pages: Overview page, Object Types page, Property Types page, Object Instances page, Display Order page, and User Settings page.

  • The Overview page provides short description for each page of this wizard.
  • The Object Types page lets us choose and select the types of objects which would be used in the Bulk Editor.
  • The Property Types page lets us choose and select the properties to edit for each object.
  • The Object Instances page lets us choose and select the particular objects from the model to use in the Bulk Editor.
  • The Display Order page lets us specify order in which rows for the object types and columns for the properties would be displayed in the Bulk Editor.
  • The User Settings page lets us manage optional behavior of the Bulk Editor.

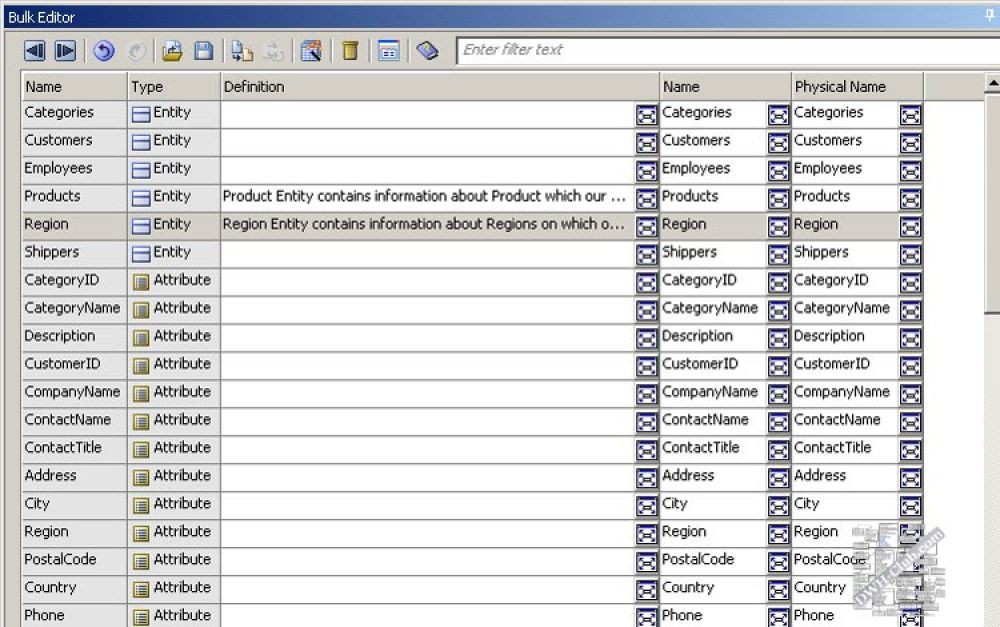
Having chosen all necessary options and clicking Edit button, we can see all chosen object and their properties in the Bulk Editor. Now, we can directly edit objects' properties in the Bulk Editor. We can edit almost all objects' properties except for system maintained properties, vector properties (properties with more than one value), and bit-field properties, such as Trigger Type. It is possible to copy value to clipboard, make changes and paste the changes back into the Bulk Editor, delete objects, etc.

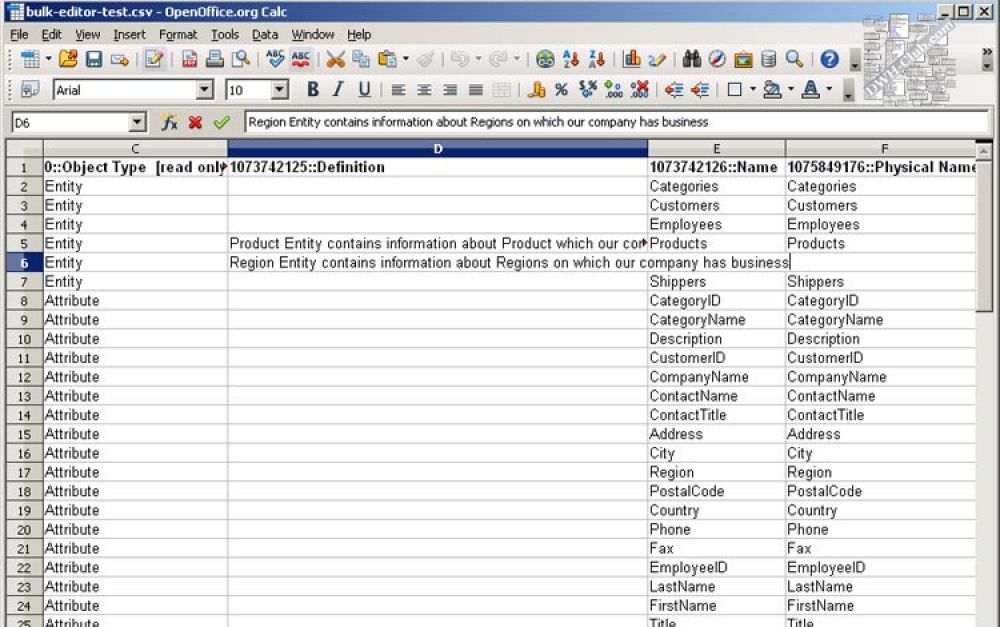
Moreover, I believe this is its most important feature, the Bulk Editor lets us export information to and import it from an external csv-file. Thus, when it is needed to perform bulk editing of model objects' properties outside ERwin, just perform the following steps:

  • Use the Bulk Editor Wizard to choose object types, property types, and object instances to populate the Bulk Editor
  • Select the rows in the Bulk Editor which you want to edit in external spreadsheet application, and click the "Save selected rows to .csv file" icon  on the pane toolbar to export information to a csv-file
  • Open the csv-file in the spreadsheet application – employees without installed ERwin can be provided with this csv-fail, – perform needed editing, and save the file
  • In the Bulk Editor, click the "Import model updates from .csv file" icon  on the pane toolbar to import the updates from the csv-file.


Figures 01-08. Using Bulk Editor and Bulk Editor Wizard (the images are clickable)

Doubtless, ability to perform bulk changes of many objects and properties and especially ability to export and import data make the Bulk Editor an extremely useful tool for data modelers.

Support of Newest Database Management System Versions

Erwin Data modeler r8 includes updated support for DB2 for LUW and DB2 for z/OS, provides improved support for SQL Server 2008, and support for Teradata 13.0.

Support for SQL Server 2008 features includes:

  • Filtered indexes
  • Sparse columns
  • Change data capture
  • Synchronous net-changes change tracking
  • New data types (DATETIME2, DATETIMEOFFSET, TIME; GEOGRAPHY, GEOMETRY; FILESTREAM; HIERARCHYID)

The following new physical objects were added to support SQL Server 2008:

  • Cryptographic Providers
  • Database Audit Specifications
  • Database Encryption Keys
  • Full-text Stoplists
  • Resource Pools
  • Server Audit Specifications
  • Server Audits
  • Spatial Indexes
  • Workload Groups

The following Teradata Version 13 features were included:

  • Global Persistent Data Sets
  • Replication Rule Sets

Crystal Reports

A copy of Crystal Reports 2008 and the Report Viewer are included with ERwin 8r (note Crystal Reports is not included with the Community Edition of ERwin 8r). Crystal Reports can be used to build reports on any open model. To create reports, we set ERwin as the current data source and query the ERwin metadata. Pre-designed reports are available and can be reached by using the Pinned Reports menu item of the Tools menu. Although Crystal Reports is not available in the Community Edition of ERwin, the Report Viewer allows us to view pre-designed reports.

Pre-designed reports are available and can be reached by using the Pinned Reports menu item of the Tools menu. The following pre-designed reports are available in ERwin r8: Current Diagram Membership (Logical).rpt; Current Diagram Membership (Physical).rpt; Diagram Picture Report.rpt; Inheritance State of Attributes.rpt; Inheritance State of Columns.rpt; Logical Dictionary.rpt; Logical-Physical Combined Dictionary.rpt; Logical-Physical Properties.rpt; Physical Dictionary.rpt; Physical Indices.rpt; Session Activity.rpt; Subject Area Membership.rpt.

The Report Viewer provides the capability to view and refresh the reports, search a text within reports, print reports, and export reports to other formats. The following formats are supported: Adobe PDF (.pdf), Microsoft Excel 97-2003 (.xls), Microsoft Word (97-2003), Rich Text Format (.rtf), and XML (.xml).

Subject Areas

ERwin r7.x concept of Main Subject Area is now obsolete. Moreover, in ERwin r8, it is not necessary that a model contains a subject area at all. Depending on the particular model's needs, subject areas can be created or not.

When an r7.x model is opened in ERwin 8r, the Model Upgrade wizard opens. The wizard provides options to choose whether to retain the main subject area in the upgraded model or not.

Auto Hide Feature

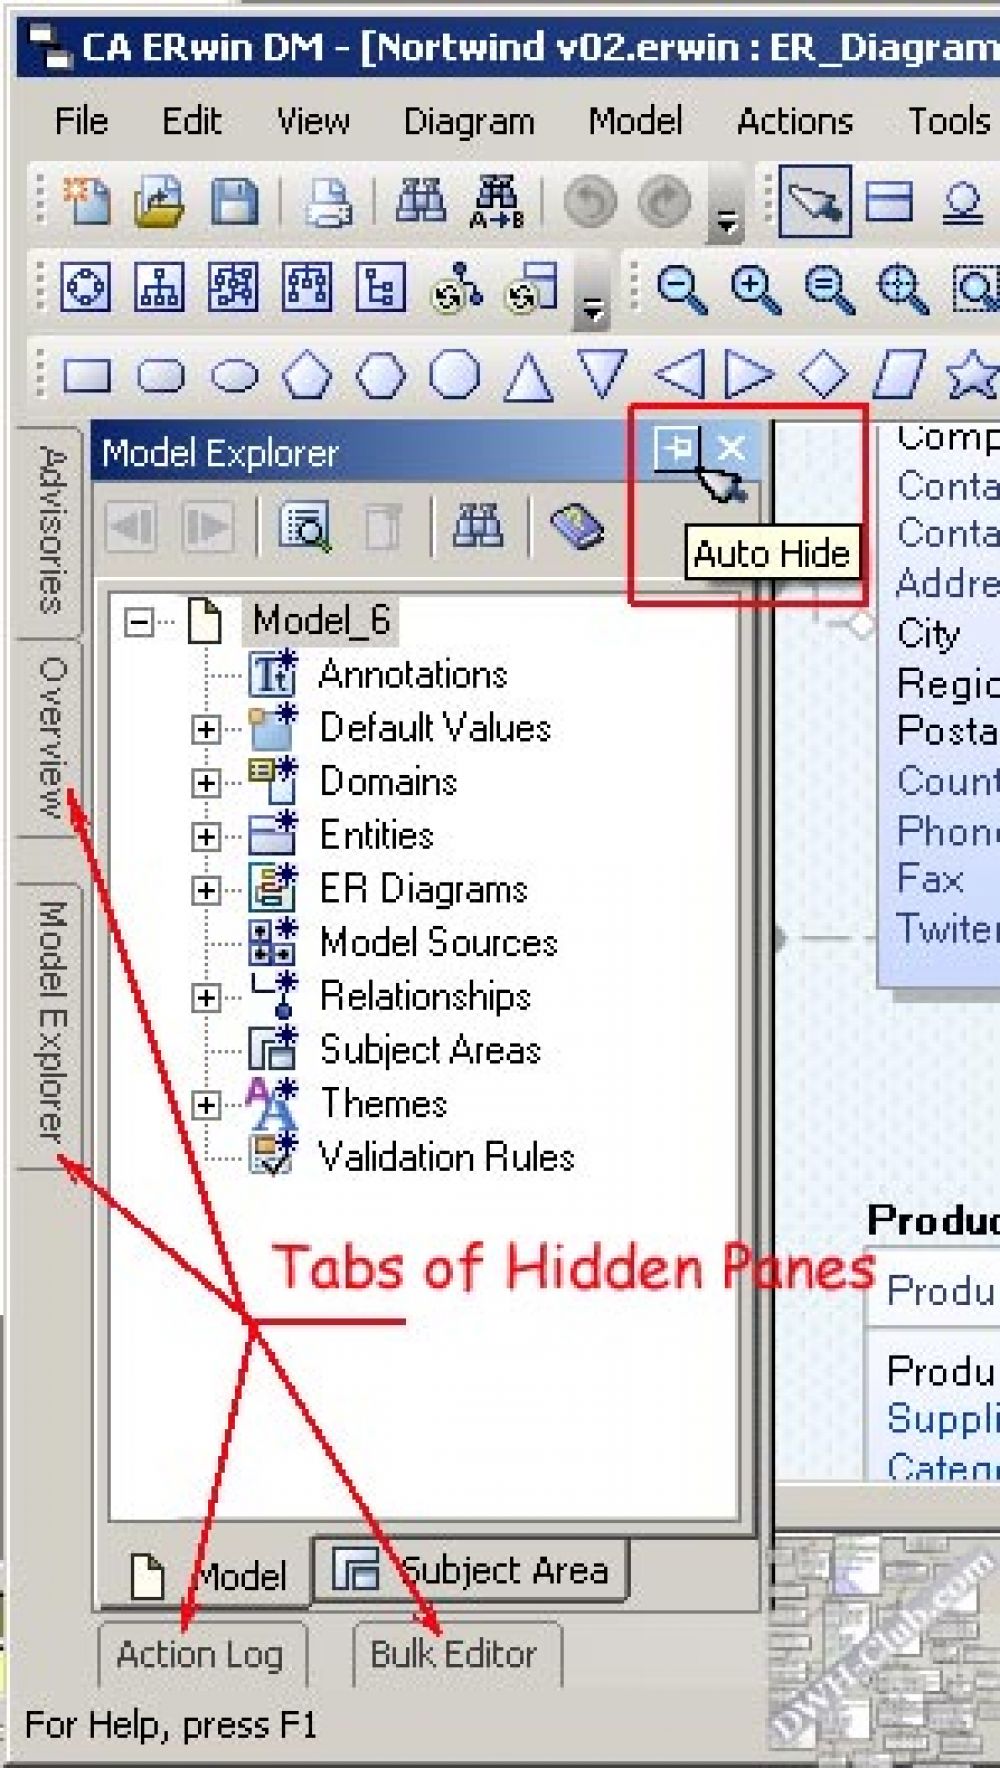
The Auto Hide option can be turned on for all Windows panes (Explorer Pane, Action Log Pane, Advisories Pane, Overview Pane, and Bulk Editor Pane). If this option is On for a certain pane, the pane only appears when it is needed for work and the pane hides at all other times.

To activate Auto Hide option, click the pushpin icon  in a pane title bar; just then the pane becomes a tab in the application.


Figures 09. ERwin 8r Auto Hide Features (the image is clickable)

If a hidden pane is needed to work, just move the mouse pointer over the tab that represents the needed pane; and the pane will be restored. When the mouse pointer leaves the pane area, the pane is auto-hides and becomes the tab once again.

To turn off Auto Hide feature, click the pushpin icon  in a pane title bar when the pane is open.

Toolbars

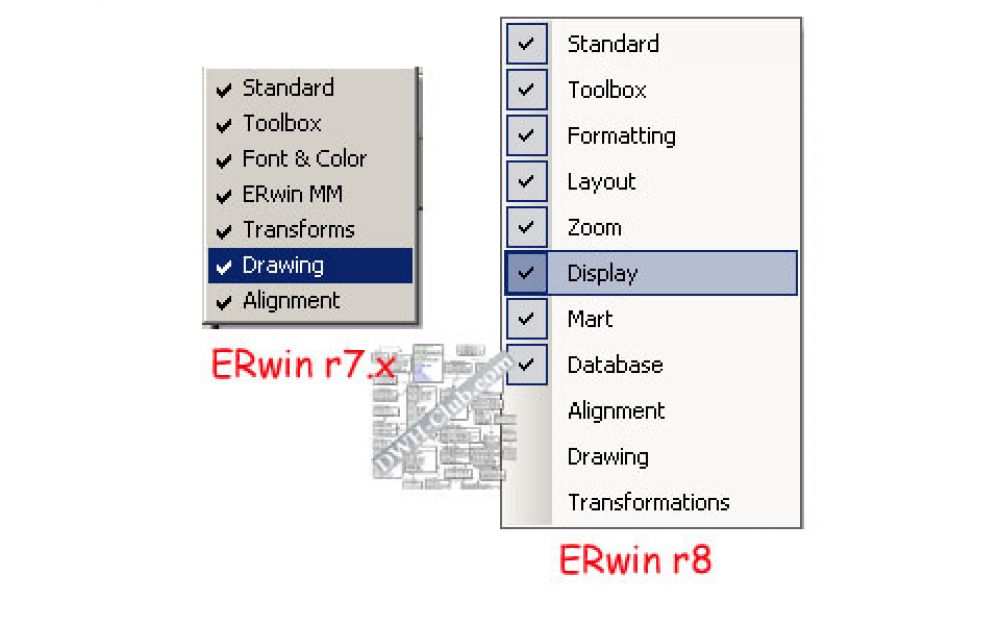
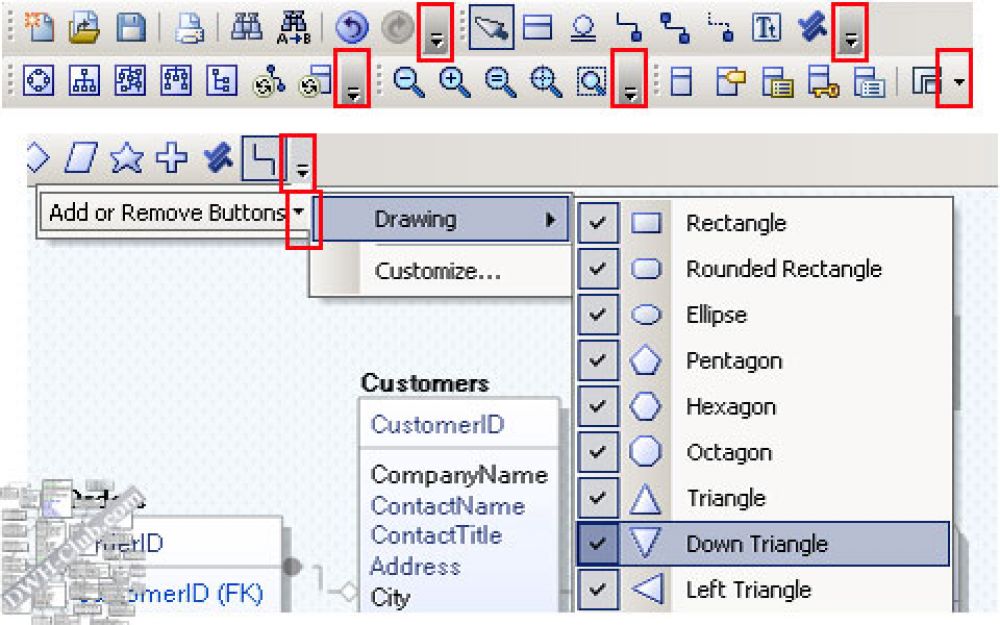
We can see several new toolbars in the new version of ERwin Data Modeler. Moreover, each toolbar can be personalized by using the drop-down menus associated with each toolbar. These drop-down menus allow us to customize any toolbar. Any specific tool can be showed or hidden on the toolbar.


Figures 10-11. ERwin 8r Toolbars and Toolbar's customization (the images are clickable)

Panes

There are five additional panes in ERwin 8r: Explorer pane, Action Log pane, Advisories pane, Overview pane, and Bulk Editor pane. The panes provide additional useful functionality.
Each pane can be hidden or showed by using the Windows menu item of the View menu. Also, panes can be docked at a convenient for a modeler position (positioned to any border of workspace), can be put in any place of the workspace (floating position). Moreover, each pane can be set in the auto-hide mode providing eo ipso much more space for diagram.


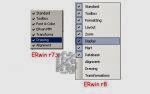
Figures 12. ERwin 8r Window Pane Menu (the image is clickable)

Text Editor and Spell Checker

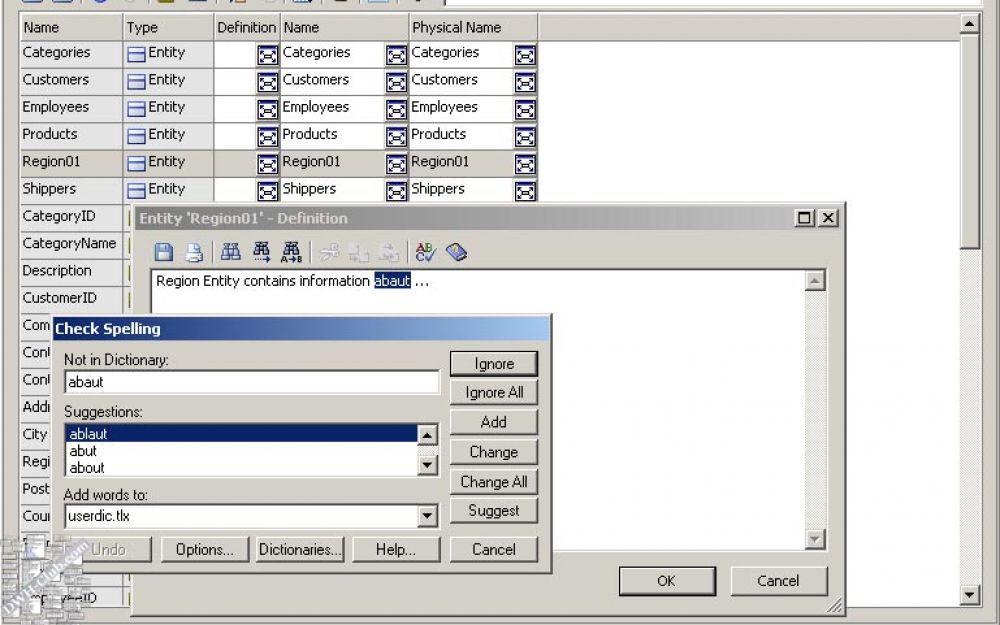
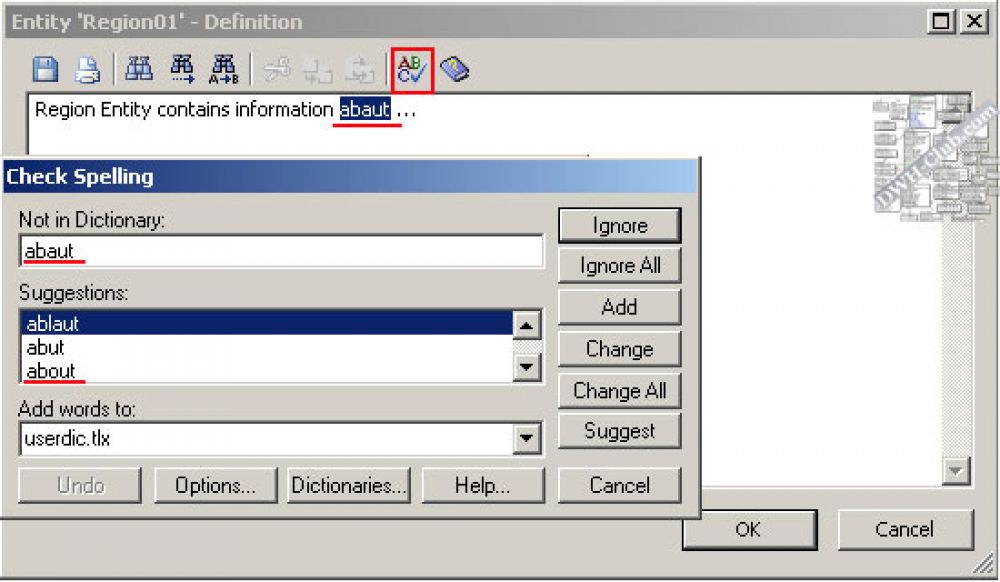
The Text Editor is available in dialog tabs which provide the capability to work with text, such as the Comment tab, the Definition tab, etc. The Text Editor provides additional functionality to work with the text: to save, to print, to search and/or replace text, and especially to check the spelling of the text written in this fields.

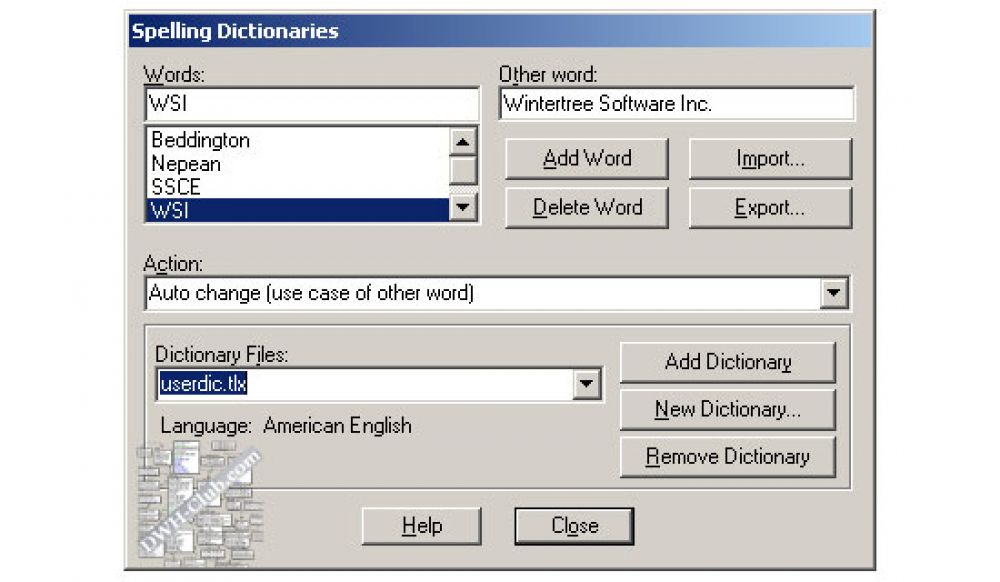
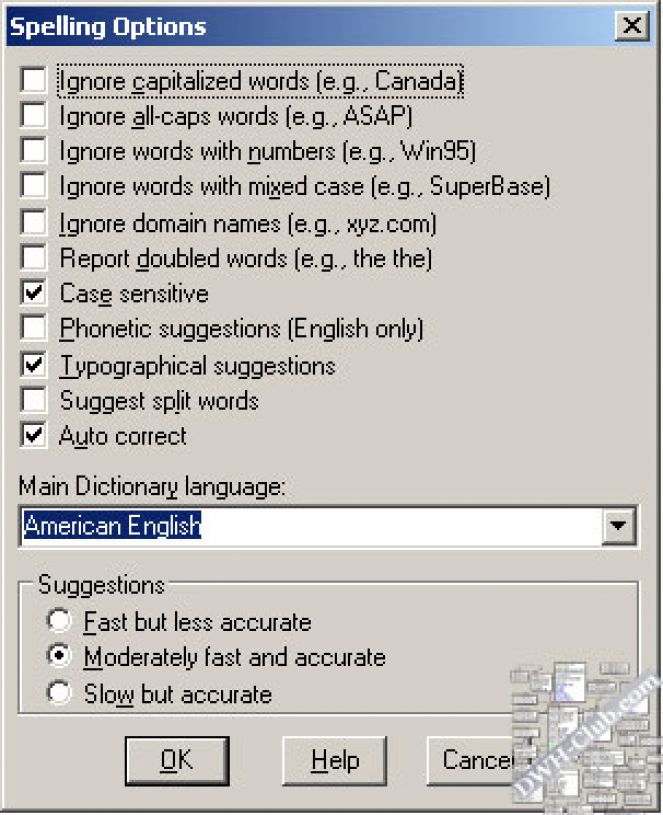
Spell-check functionality of ERwin 8r allows us to check whether we have made any spelling mistakes in the text. Also, these are possible to select dictionary languages, customize the dictionaries, specify various spelling-checker options, and determine the speed and accuracy of search for suggested replacements for misprinted words.


Figures 13-15. ERwin 8r Spell Checker and Spelling Options (the images are clickable)

Auto-layout options

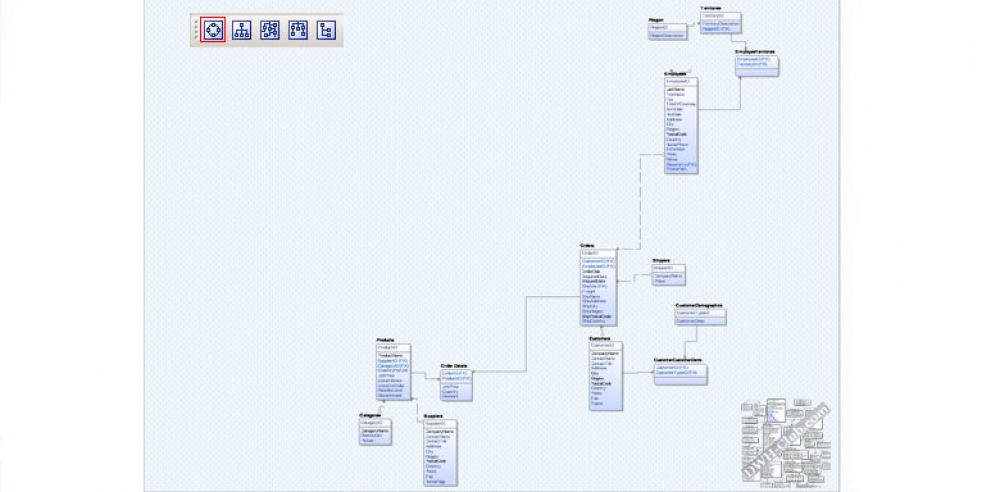
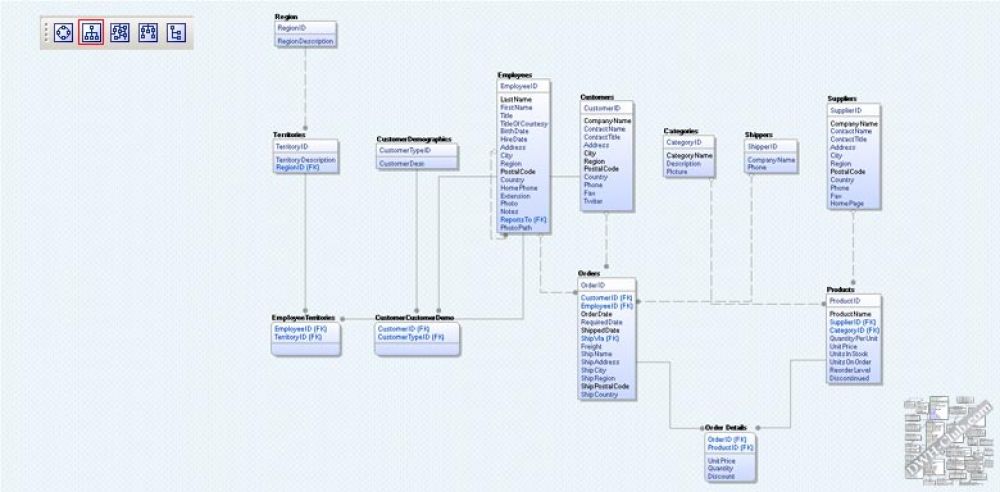
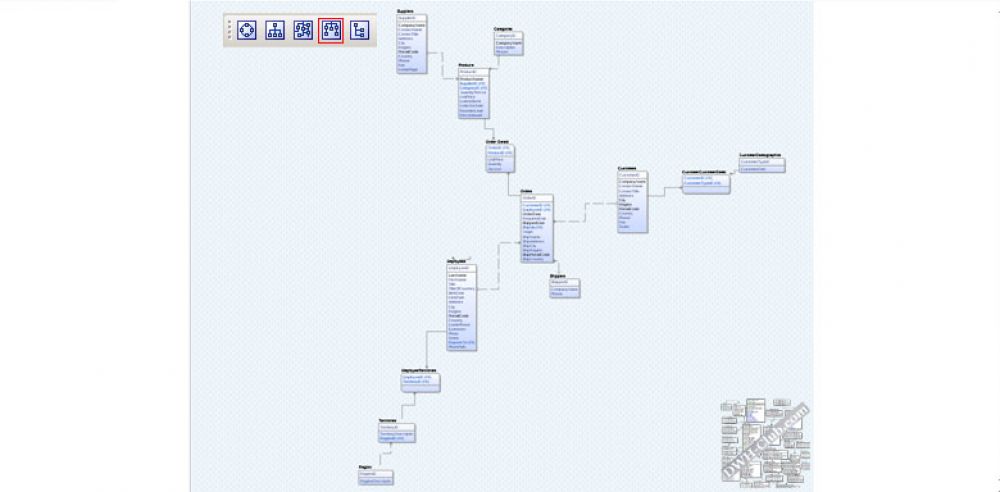
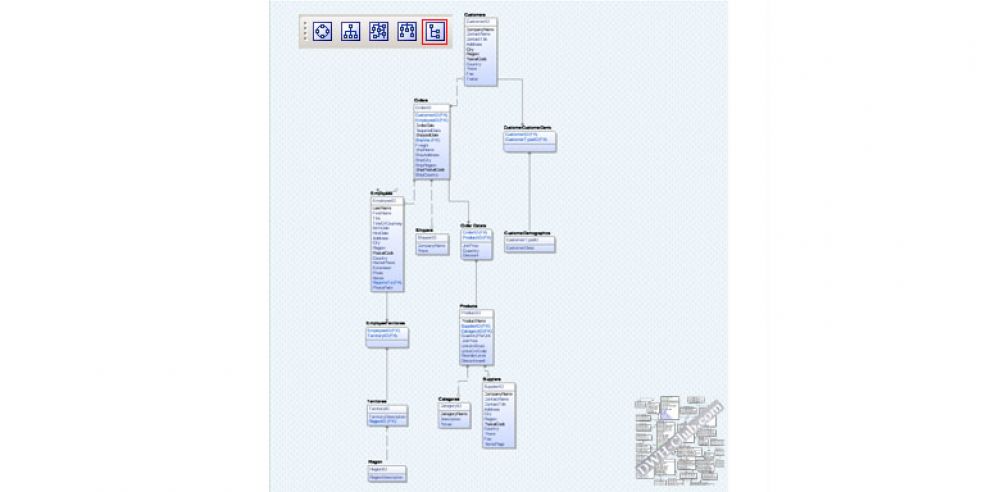
ERwin 8r allows us quickly and automatically lay out diagram's objects which are become disorganized during designing process. It is possible to implement a particular layout type to several selected diagram's items, or an entire model can be organized in a certain style of layout. Layout types include:

  • Circular Layout
  • Hierarchical Layout
  • Orthogonal Layout
  • Symmetrical Layout
  • Tree Layout

To automatically lay out a diagram, the Layout Toobar or the Layout menu item of the Diagram menu can be used.


Figures 16-20. Northwind Diagram in Different Layouts:
Circular Layout, Hierarchical Layout, Orthogonal Layout, Symmetrical Layout, and Tree Layout

(the images are clickable) 

Property Editors' Enhancements

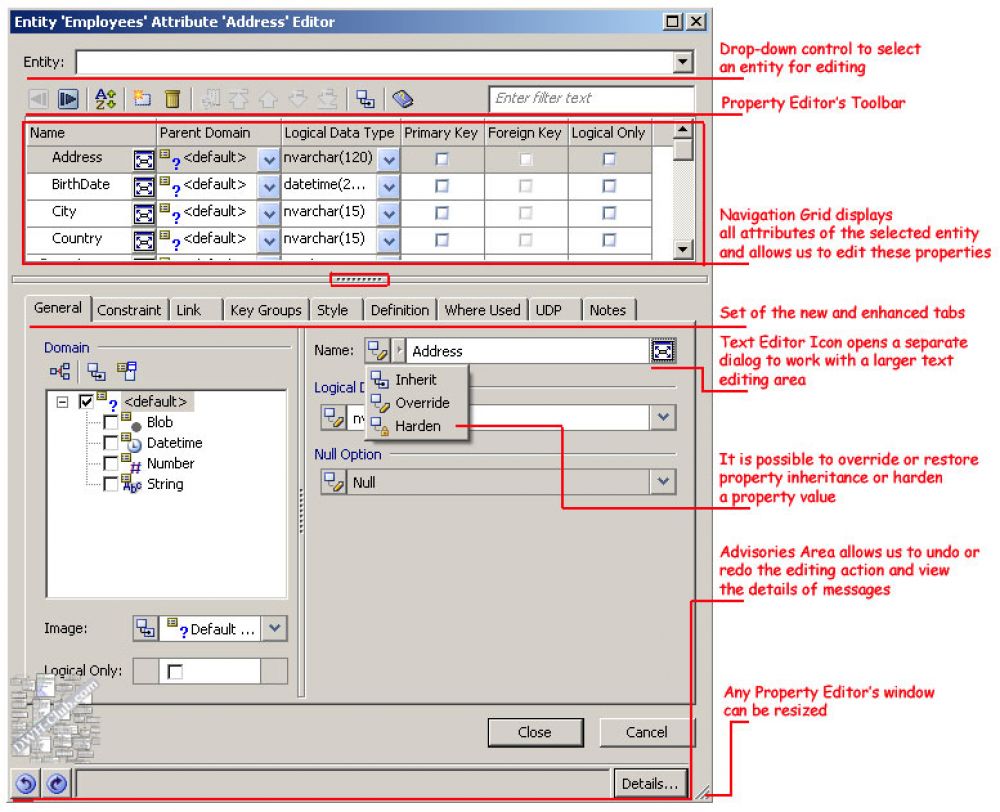
Property Editors are significant enhanced in ERwin 8r. The editor dialog windows became resizable, scrollable, and adaptable. Enhancements were made to the Property Editors' tabs. Also, there are some new tabs: the Link tab, the Style tab, the Where Used tab, and the Notes tab.

  • The Link tab allows us to view and manage the column denormalization transformations.
  • The Style tab allows us to define a display style for the selected object by using a Theme.
  • The Where Used tab allows us to see where an object is used in the model.
  • The Notes tab allows us to see, enter or modify user notes for the object and view object history.


Figures 21. ERwin 8r Property Editors' Enhancements (the image is clickable)

Link objects and Link Wizard

The column denormalization transformation is implemented differently in versions r8 and ERwin r7.x. To perform the column denormalization, the Link object is used. A Link object is automatically created to link an attribute/column of a source entity/table to an attribute/column of a target entity/table. The Link object synchronizes all changes of one attribute/column to another attribute/column.

The Link Wizard is used to create Link objects and define their properties. The Attribute Editor and the Column Editor contain the Link tab which allows us to launch the Link Wizard.

When an r7.x model that contains column denormalization transformations is converted to r8, the attributes of the column denormalization transformations become the link objects.


Figures 22. Creating of ERwin 8r Link Object (the image is clickable)

New Zoom Tool and Overview pane

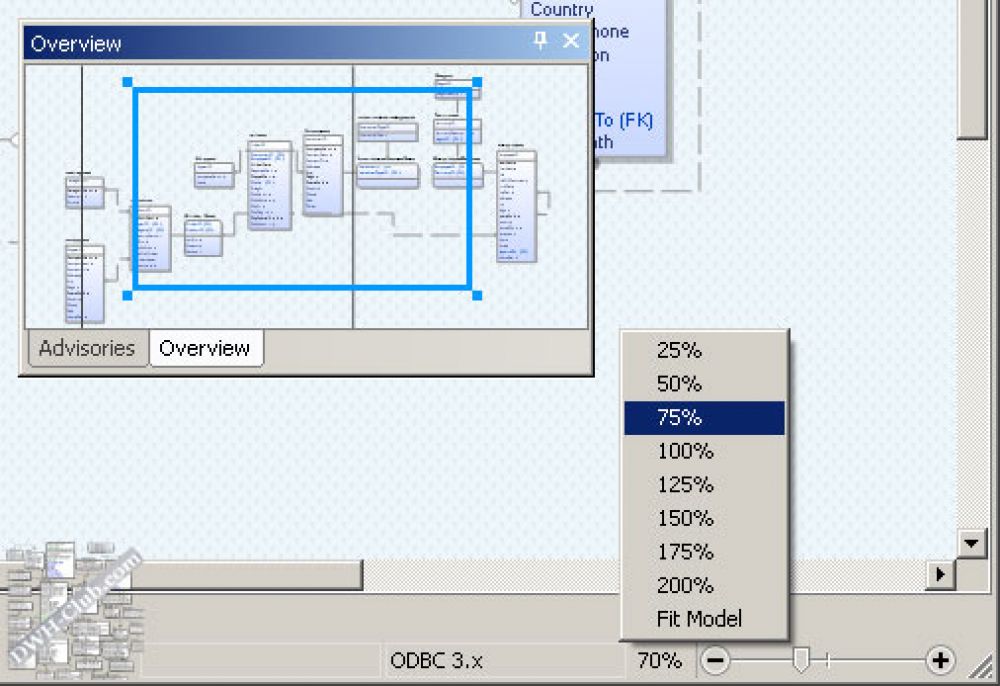
New Zoom Bar is located on the bottom right-hand corner of the application. The Zoom bar consists of two parts. The first is the rectangle button which displays percentage information. Clicking on this button shows the pop-up rectangle which provides choice from the list of zoom percent values. The second element is the zoom slider. Dragging the pointer of this slider, the scale of diagram image can be changed between 1% and 200%. Also, the zoom percent value can be manipulated by clicking on the plus or minus signs at the ends of the zoom slider.

There is one more way to change the scale of diagram image and navigate through a model. The ERwin 8r Overview pane has the marquee rectangle that is used to determine diagram's area that is visible in the drawing workspace. Moving and resizing of this marquee rectangle can change visible diagram's area as well as scale of diagram image.


Figures 23. ERwin 8r New Zoom Tool and Overview pane (the image is clickable)

Go To Functionality

Go To functionality allows us to quickly change the diagram focus to the needed diagram's object. The Go To dialog box is launched by pressing Ctrl+G keys. The dialog box contains the list of all model's objects. Select any item from the list and click the Go To button, to move focus to this object on the diagram.


Figures 24. ERwin 8r Go To Dialog Window (the image is clickable)

Annotation and drawing objects

In additional to drawing object, new object that is called Annotations is available in ERwin 8r. Unlike drawing object which are "local" object and has restricted visibility, annotations have "global" visibility and can be reused across all diagrams. Note annotation objects require additional memory, so use them if they are needed across a few models.

The new Drawing toolbar contains more drawing tools that the Drawing toolbar of ERwin 7r does, but the Polygon and the Text tools are omitted from the ERwin 8r Drawing toolbar. Omitting the text tool from Drawing objects looks no so good because of creating a new global object every time a text commentary needs, even though this commentary is not reused.

Object's Hint

This is a pleasant effect rather than big improvement. When the cursor moves over diagram's object, the hint appears and shows us information about this object.


Figures 25. Object's Hint in ERwin 8r (the image is clickable)

Diagram Picture

Generation of illustrated (pictorial) reports is available in Erwin 8r. The illustrated reports can be useful to share a data model with colleagues who do not have CA Erwin Data Modeler installed on their computers. To generate a diagram picture, use the Diagram Picture menu item of the Tools menu. Also, an illustrated report can be created by using Crystal Reports integrated into ERwin 8r.

Model Themes

ERwin 8r provides more capability for art designing models and diagrams than previous versions of this modeling tool do. Art features are available by using themes. Themes are a combination of formatting and display options (such as font, color, style, etc.) which can be applied to design model's objects. The theme features of Erwin allow us to completely control over color, lines, and gradients for the diagram or any objects. To modify a theme or create a new theme, the Theme Editor is used.

History and Notes

ERwin 8r can trace the history of all diagram's objects. Moreover, the History and Notes functionalities are combined. ERwin provides data designers with a complete list of automatically generated historical records and commentaries written by the model's developers.

(Chơi cho vui) AIRDROP CHAINGE FINANCE - dự án xây dựng ứng dụng ngân hàng số cho mọi người

 Không hiểu lắm về cái này, tuy nhiên thấy quảng cáo khá nhiều, lại chỉ cung cấp vài thông tin cá nhân (mà mấy ông lớn như facebook với goog...