Hiển thị các bài đăng có nhãn IT_Office. Hiển thị tất cả bài đăng

Thứ Ba, 29 tháng 11, 2016

Conflict Vietnamese Language on Win10 Anniversary

Kevin Bui: 3:55 PM 11/16/2016

·         Phiền phức đến từ tính năng thông minh của bản cập nhật Windows 10 Annniversary. Đó là tính năng nhận biết người dùng là người quốc gia nào và đổi lựa chọn ngôn ngữ sang quốc gia đó. Tuy nhiên điều này đã làm tính năng gõ tiếng Việt của các trình tiếng Việt như Unikey không còn tác dụng - nghĩa là không gõ được tiếng Việt khi ngôn ngữ hệ thống là ENG - chỉ gõ được khi chọn ngôn ngữ hệ thống là VIE

·         Một nhược điểm nữa của việc chuyển ngôn ngữ về VIE là nó kèm theo bàn phím tiếng Việt kiểu của Microsoft - gần giống như bàn phím VNI. Khi đó các phím chữ số sẽ thành các ký tự không có ý nghĩa

·         Thêm nữa, Win 10 lại luôn tự động chuyển đổi về dạng ENG, ví dụ sau khi màn hình khóa lại - người dùng đăng nhập lại thì ngôn ngữ mặc định về ENG. Khi đó lại không gõ được tiếng Việt - mặc dù Unikey vẫn đang bật chế độ tiếng Việt


Cách khắc phục

+ ĐẶT CHẾ ĐỘ GÕ ĐÃ MẶC ĐỊNH LÀ US cho cả hai ngôn ngữ là ENG và VIE - khi đó, nếu Windows phát hiện Unikey bật chế độ gõ tiếng việt thì ngôn ngữ VIE được tự động chọn - NHƯNG CHẾ ĐỘ GÕ VẪN LÀ US  - nên không bị lỗi gõ tiếng Việt trên hàng phím số

+ Cách thực hiện: Vào ControlPanel / Language & Regional / Language

- Thêm ngôn ngữ VIE -> chọn Option -> thêm bàn phím US -> xóa bàn phím VIE -> Save

- Có thể xóa ngôn ngữ US nếu thích - tuy nhiên nó chỉ ẩn đi mà thôi - nếu Unikey không được bật, hoặc ở mở máy sau chế độ khóa máy thì ngôn ngữ US lại tự động được chọn


Thứ Sáu, 4 tháng 3, 2016

Open OneNote's NoteBooks from other accounts on Windows Phone

BCT: 3/4/2016 9:25 AM

Cách mở Notebook của account khác trên điện thoại Windows Phone. Áp dụng trong trường hợp:

·         Đã đăng ký một tài khoản Microsoft (M1) cho điện thoại Windows Phone. Khi đó mặc định OneNote trên điện thoại chỉ mở được Quick Notes trên tài khoản M1.

·         Phát sinh nhu cầu mở Quick Notes trên tài khoản khác (ví dụ M2) trên điện thoại vì nhiều lý do, ví dụ như dung lượng trên tài khoản M1 đã hết chẳng hạn. Mặc dù phần mềm OneNote trên Windows Phone 8.1 có chức năng mở NoteBook từ tài khoản khác, tuy nhiên thực tế đã thử mở tài khoản hotmail hoặc outlook khác nhưng không được - có thể trên Windows Phone 10 có thể sẽ hoàn thiện hơn. Vậy với Nokia 1520 chạy Windows Phone 8.1 thì làm thế nào?

Qui trình làm như sau:

1.      Sử dụng OneNote 2016 trong bộ Office 2016 để mở NoteBook muốn sử dụng (trên tài khoản M2)


2.      Nhấn phải chuột vào NoteBook, chọn Share This NoteBook và làm như hướng dẫn trên hình bên dưới


3.      Trên điện thoại, vào ứng dụng Mail mở đường link chia sẻ. Ứng dụng OneNote sẽ tự động chạy và mở NoteBook được chia sẻ của tài khoản M2.

4.      Nếu không muốn dùng NoteBook của M1 trên điện thoại nữa thì nhấn lỳ trên Quick Notes của M2 -> chọn Set Default. Sau đó có thể Close NoteBook của tài khoản M1 trên điện thoại

Để dễ quản lý ghi chú, không nên tạo quá nhiều NoteBook. Kinh nghiệm cho thấy chỉ nên tạo 1 NoteBook, sau đó tạo các GROUP SECTION để phân loại. Mặc định trên điện thoại, khi tạo ghi chú nhanh thì nơi lưu sẽ là Quick Notes mặc định. Sau đó có thể Move/Copy đến Group Section phù hợp.

Để chuyển đổi toàn bộ một NoteBook từ tài khoản M1 sang tài khoản M2, cách dễ nhất là mở cả hai bằng ứng dụng OneNote 2016 trên máy tính rồi dùng chuột kéo thả cả Group Section từ M1 sang M2.


Thứ Năm, 11 tháng 9, 2014

Office 2007 Configuration wizard runs every time I start any Application (word, excel, etc)

http://social.technet.microsoft.com/Forums/en-US/7e14f498-485c-40c5-b522-d36d9b0c5697/office-2007-configuration-wizard-runs-every-time-i-start-any-application-word-excel-etc?forum=officesetupdeploylegacy

Office 2007 Configuration wizard runs every time I start any Application (word, excel, etc)

Question

Hi!

I've installed Office 2007 Enterprise on my Vista x64 system, but when I'm
starting any of the Office apps, Office runs a setup/configuration prog
(Office is collecting/gathering setup information or something like that).

My event log has produced
numerous warnings, on of the more significant is :

Detection of product '{90120000-0030-0000-0000-0000000FF1CE}', feature
'ProductFiles', component '{6252B847-BADA-43D4-9252-E39767FA40A1}'
failed.  The resource 'HKEY_CLASSES_ROOT\.pip\' does not exist.

I tried to access the HCR\.pip\ key in Regedit and receive the
following message:

"Error Opening Key
..pip can not be opened.
An error is preventing this key from being opened.
Details: Access is denied."

 I have tried the Windows Installer Clean up utility to remove all
traces of Office, cleaned the registry, reinstalled Office 2007 
4 times and still have the install/configuring messages popping up
upon loading the Office programs..

ANY information would be appreciated !!!

Thanx a lot @lby

Answers

The fix to the problem is very simple as it turns out - simply run the following commands by typing it into the Start/Run command box.  Use the line with Office\11.0 if you have Office 2003 installed and Office\12.0 if you have Office 2007 installed.  You can use both if you have both installed :

reg add HKCU\Software\Microsoft\Office\11.0\Word\Options /v NoReReg /t REG_DWORD /d 1

reg add HKCU\Software\Microsoft\Office\12.0\Word\Options /v NoReReg /t REG_DWORD /d 1

That is it.  Office 2007 might want to have one more spin round the block with it's configuration dialog box, but that should be it.

I'm not sure if this fix will work with Windows 7, but I know it works with XP & Vista.

Hope this helps.


Thứ Hai, 25 tháng 8, 2014

Blurry Fonts or Poor Display Scaling In Office 2013 Programs

http://www.thewindowsclub.com/blurry-fonts-poor-display-scaling-office-2013

Fix: Blurry Fonts or Poor Display Scaling In Office 2013 Programs

RECOMMENDED: Click here to fix Windows errors and optimize system performance

To match the theme of Windows 8, Microsoft Office 2013 also follows the same Metro UI concept. DPI Scaling plays an important role in using programs having Modern UI. When the scaling is not properly configured, fuzzy and blurry content comes into play. Poor Display Scaling makes the programs look quite bad.

Dots Per Inch (DPI) Scaling is one of the additional feature introduced in Windows 8.1 regarding projection of display to external devices. For a specified resolution say 1366×768 pixels, DPI Settings must be above 100%. DPI Settings are of important concern when you project the Windows 8 Start Screen to a projector. If the DPI Settings remains below a predetermined level, the Metro tiles will loose their charm and fluidity, and will be displayed as mere boxes.

Blurry Fonts In Office 2013 Programs

So how does one avoid poor scaling of Office 2013 components? Well, you can try disabling external monitors and see if it helps. Or you can try using the Compatibility option. If these do not work, you can try this method.

1. Open your Microsoft Office installation folder. Right-click on the icon of the Office program for which you're facing the issue of poor scaling and select Properties.

(Phải vào hẳn trong thư mục cài đặt – bản 32bit là: C:\Program Files (x86)\Microsoft Office\Office15 – mở Properties mới có Tab Compatibility như bên dưới)

2. Now in the Properties window, switch to Compatibility tab and put a check mark against Disable display scaling on high DPI settings. Click Apply followed by OK.

Now reopen the Office programs, and you will find that their content will not be blurry.

There may be a possibility that you may find that the option is disabled or grayed out. In such a case, you will to manipulate the concerned registry setting. To do so, press Windows Key + R combination, type put Regedt32.exe in Run dialog box and hit Enter to open the Registry Editor.

2. Navigate to the following location:

HKEY_CURRENT_USER\Software\Microsoft\Windows NT\CurrentVersion\AppCompatFlags\Layers

3. In the right pane of this location, create a new string value using Right click -> New -> String Value. Name this string so created as the file location of your Office 2013 component program. For instance – say PowerPoint, – in my case its located at E:\Program Files\Microsoft Office\Office15\POWERPNT.EXE. Now double click on the same string to modify its Value data:

4. In the Edit String box, put the Value data as ~ HIGHDPIAWARE. Now, close the Registry Editor and reboot the machine to make changes effective. After reboot you won't see poor scaling issues with Office 2013 programs.

You may also try the following. From the Office program options, under the Advanced section, check the Disable hardware graphics acceleration setting and see if it helps you. For eg. open Outlook 2013 > File Options > Advanced > Display > Check the Disable hardware graphics acceleration box > OK. Restart your computer.

Hope something helps.

You may want to also check this post on how to Disable DPI virtualization or Lower the overall Windows DPI setting system-wide to resolve such issues.

Additional readings to help issue of blurry fonts:

  1. There are some additional steps you may want to take if you find that Web fonts appear blurry in Internet Explorer.
  2. To fix the issue of Blurry Fonts in Windows 8.
  3. Make text easier to read using ClearType Tuner in Windows 8 | 7.

5

Posted by KapilArya@TWC on November 6, 2013 , in Category Office with Tags Office 2013, Tips

An Electrical Engineer by profession, Kapil is a Microsoft MVP in Windows - Consumer and a Microsoft Content Creator. He recommends that you create a system restore point first before tweaking the registry.


Thứ Năm, 15 tháng 5, 2014

Cách đổi tên các tài khoản mail trong Outlook 2013

BCT:

Cách đổi tên các tài khoản mail trong Outlook 2013

Mục đích: để dễ quản lý khi tạo lập nhiều tài khoản trên Outlook


Hướng dẫn Import và Export Contacts từ các tài khoản mail khác nhau vào Outlook hoặc từ các tài khoản mail sang nhau

BCT:

Hướng dẫn Import và Export Contacts từ các tài khoản mail khác nhau vào Outlook hoặc từ các tài khoản mail sang nhau.

- Thêm tài khoản mail vào Outlook 2013 và để thiết lập tự động. Lúc này Outlook sẽ thiết lập kết nối theo giao thức IMAP hoặc EAS – tùy theo loại dịch vụ mail. Chỉ có hai giao thức này thì các thông tin về Contacts, Calendar và Notes mới có thể đồng bộ hoàn toàn.

- Vào chức năng People để COPY và chuyển từ các tài khoản này sang tài khoản khác (theo hình bên dưới)

- Sau khi đã Import xong, có thể gỡ các tài khoản mail không cần dùng khỏi Outlook


Lỗi đồng bộ các tài khoản Microsoft (Hotmail, live, outlook) khi sử dụng giao thức EAS – Exchange ActiveSync

BCT:
Lỗi đồng bộ các tài khoản Microsoft (Hotmail, live, outlook) khi sử dụng giao thức EAS – Exchange ActiveSync của chính Microsoft trên Outlook 2013

  • Khi cài đặt các tài khoản mail trên Outlook 2013, nếu để tự động cài đặt thì các tài khoản của Microsoft sẽ mặc định sử dụng giao thức EAS. Giao thức này có những tính năng giống như IMAP nên có những tính năng rất hữu ích. Ví dụ như tạo và quản lý các thư mục trong Inbox, mọi dữ liệu tại máy người dùng và dữ liệu trên Mail Server được đồng bộ như nhau nên rất tiện dụng.
  • Tuy nhiên, do thời gian time out của các dịch vụ mail của Microsoft có vẻ như ngắn hơn thời gian đồng bộ mặc định trong Outlook (mặc định là 30 phút) nên đến chu kỳ đồng bộ, Outlook sẽ kết nối lại với Mail Server, tuy nhiên do đã quá thời gian duy trì kết nối nên Mail Server sẽ từ chối và gây ra lỗi Disconnected. Kể cả có tắt Outlook đi và bật lại, lỗi này vẫn không giải quyết được. Chỉ có một cách giải quyết là vào chức năng Account và dung chức năng Repair hoặc Change để thiết lập lại kết nối khác.
  • Chính vì vậy, cách giải quyết triệt để lỗi này là thiết lập thời gian đồng bộ xuống thấp hơn thời gian time out của truy cập – đã thử thành công với thiết lập 15 phút đồng bộ một lần.
  • Cách thiết lập như hình vẽ sau:

BCT:  (11:01 AM 5/16/2014)
Có vẻ như thời điểm hiện tại, cách trên vẫn chưa giải quyết hết được vấn đề. Hôm qua thiết lập và duy trì kết nối được cả ngày, tuy nhiên sáng nay lại lỗi như thường. Chỉ còn cách ngồi chờ đợi bản nâng cấp của chính Microsoft (không biết lỗi từ đâu, nhưng có thể nằm trong giao thức EAS hoặc Outlook 2013, hoặc cũng có thể trong chính trong Windows 8.1)

Tạm thời có hai cách khắc phục sau, ai bị thì có thể tham khảo trong lúc chờ đợi bản vá:
- Cách 1: đơn giản nhất là nhấn vào SEN/RECEIVE và nhấn Work Offline 2 lần là kết nối sẽ lại thiết lập
- Cách 2: Vào Account\ chọn tài khoản bị Disconnected, chọn Repair và nhấn Next là Outlook tự động thiết lập lại kết nối

Thứ Hai, 5 tháng 5, 2014

Download headers and messages for POP3 e-mail accounts - Outlook

http://office.microsoft.com/en-us/outlook-help/download-headers-and-messages-for-pop3-e-mail-accounts-HP010102427.aspx#BM3


Download headers and messages for POP3 e-mail accounts

Show All

When working with your POP3 e-mail account, you can choose to download either message headers or complete messages, including attachments. Once a message is downloaded from your e-mail server, the default setting is to delete the message from the e-mail server to free up space in your e-mail account with your Internet service provider (ISP).

Downloading only the headers first from your POP3 mail server can be useful if you receive large e-mail messages. Based on the information in the headers, you can selectively download only the items that you want. For example, when traveling with a laptop computer, you may be using a slower connection and do not want to download large messages or attachments. Therefore, downloading just the headers is useful.

This article assumes that you have already added your POP3 e-mail account to Microsoft Outlook. Find links to more information about adding e-mail accounts in the See Also section.

What do you want to do?

Download headers

E-mail message headers do not contain the body of messages. You can choose to download only the headers of all your messages and then choose some messages to download immediately. By downloading the headers and only the messages that you want, you can reduce your connection time. After you download the headers, you can choose which messages, if any, that you want to download or delete from the e-mail server.

  • Download headers manually    
    • On the Tools menu, point to Send/Receive, point to the account, and then click Download Inbox Headers.
  • Download headers automatically    
  1. On the Tools menu, point to Send/Receive, point to Send/Receive Settings, and then click Define Send/Receive Groups.
  2. Under Group Name, select a group that contains your POP3 account.

 Note   If you have not created custom Send/Receive groups, select the All Accounts group.

  1. Click Edit.
  2. Under Folder Options, select Download headers only.

 Note   If you have more than one account in a Send/Receive group, and you want to download items completely for some accounts and only the headers for some others, create another Send/Receive group. In one of the Send/Receive groups, include all the accounts for which you want to download only the headers. In the other, include the accounts for which you want to download all the items completely.

When you download a header, appears beside the message listing.

Top of Page

Mark messages to download or delete

After you download the headers, you can do one of the following with each header:

  • Mark the message to be downloaded and removed from the e-mail server.
  • Mark the message to be copied (and leave a copy on the server).
  • Delete the message from the server without downloading it.

When you download your messages, they are removed from the e-mail server by default. When you copy your messages, a copy of the message is downloaded to your computer, and the message also remains on the server allowing you to download the message from another computer. When you delete your messages in Outlook, they are removed both from your computer and from the server.

  • Mark the headers for messages to download and delete on the mail server    
    • In the Inbox, right-click the header, and then on the shortcut menu, click Mark to Download Message(s).

An icon appears after you mark a header to download a message. The icon indicates that the next time a send/receive occurs, the message will be downloaded and removed from the mail server.

  • Mark the headers for messages to be copied from the server    
    • In the Inbox, right-click the header, and then click Mark to Download Message Copy on the shortcut menu.

After you mark a header to download a copy of the message, the icon appears.

The icon denotes that the next time a send/receive occurs, a copy of the e-mail message will be downloaded to your computer.

  • Mark the headers for messages to be deleted on the mail server    
    • In the Inbox, click the item to delete, and then press DELETE. A red X appears and the first line of the header displays in strikethrough text.

 Note   You can select multiple items for deletion by holding down CTRL while clicking the messages, and then clicking DELETE.

 Note   If you move a header to another folder (for example, move it manually or by using a rule), and then mark the header, the header will not be processed when you click Process Marked Headers. Only headers in the Inbox are processed.

Top of Page

Download messages

Do one of the following:

  • Get new messages manually    
    • On the Tools menu, point to Send/Receive, point to the account, and then click Inbox.
  • Get new messages automatically    
  1. On the Tools menu, point to Send/Receive, point to Send/Receive Settings, and then click Define Send/Receive Groups.
  2. Under Group Name, select a group that contains your POP3 e-mail account, and then under Setting for group name, select the Schedule an automatic send/receive every n minutes check box, and then enter a number between 1 and 1440.

 Note   If you have not created custom Send/Receive groups, select the All Accounts group.

Your POP3 e-mail server will be checked and new messages downloaded according to the schedule that you choose.

By default, when you add a POP3 e-mail account, Outlook downloads complete items, including attachments, and then deletes the item from the server. If you change this setting to retrieve only the headers, you can switch back to complete items.

  1. On the Tools menu, point to Send/Receive, point to Send/Receive Settings, and then click Define Send/Receive Groups.
  2. Under Group Name, select a group that contains your POP3 e-mail account.

 Note   If you have not created any custom Send/Receive groups, select the All Accounts group.

  1. Click Edit.
  2. Under Folder Options, select Download complete item including attachments.

Top of Page

Delete messages on the e-mail server

By default, after a message is downloaded from a POP3 e-mail server, it is deleted from the server. However, if you are only downloading message headers, or if you have turned on the Leave a copy of messages on the server option, the message remains on the mail server.

For more information about the Leave a copy of messages on the server option, see the links in the See Also section.

You do not have to download the message to delete it from the server. You can mark headers of messages to be deleted from the e-mail server. This is useful when you recognize that an e-mail message can be deleted based on your review of the message header alone. The Mark messages to download or delete section in this article explains how to mark headers for deletion.

After a header is marked for deletion, do the following:

  1. Delete messages from your computer and from the server    
    • In the Inbox, click the item to delete, and then press DELETE. A red X appears and the first line of the header display appears in strikethrough text.

 Note   You can select multiple items for deletion by holding down CTRL while clicking the messages, and then clicking DELETE.

  1. On the Tools menu, point to Send/Receive, point to the account, and then click Process Marked Headers.

When you delete message headers, the header is deleted on your computer, and the complete message is deleted from the mail server. Therefore, any other computer or profile that you use will not be able to retrieve them from the e-mail server.

 Note   If you move a header to another folder either move it manually or by using a rule), and then mark the header, the header will not be processed when you click Process Marked Headers. Only headers in the Inbox are processed.


Chủ Nhật, 4 tháng 5, 2014

Outlook 2013 & "Download headers only"

http://www.outlook-apps.com/download-headers-only/


Outlook 2013 & “Download headers only”

0 Comments in Outlook Tips & Tricks, Outlook Tutorials by Bogdan IonitaFind me on Google +

September 4, 2013


Up to Outlook 2010, you used to be able to choose to “Download headers only” for all your Outlook accounts. However, this changed with Outlook 2013 – this blog article describes what has changed.

If you were using a POP or IMAP account with Outlook 2010 (or earlier versions), you could use the option “Download headers only” which allowed you to download only the header part of incoming emails.

This “headers only” feature served two purposes: on one side, Outlook was able to retrieve many emails much faster, so you could preview your inbox emails quicker; on the other side, you were safe from accidentally opening dubious emails (since Outlook didn’t automatically download their potentially malicious content, too).

However, starting with Outlook 2013, the “Download headers only” option is available ONLY for POP3 accounts. If you are using an IMAP account in Outlook 2013, you simply can’t use the “Download headers only” feature, so you have to either live with it or switch your Outlook account from IMAP to POP3 or to ActiveSync.

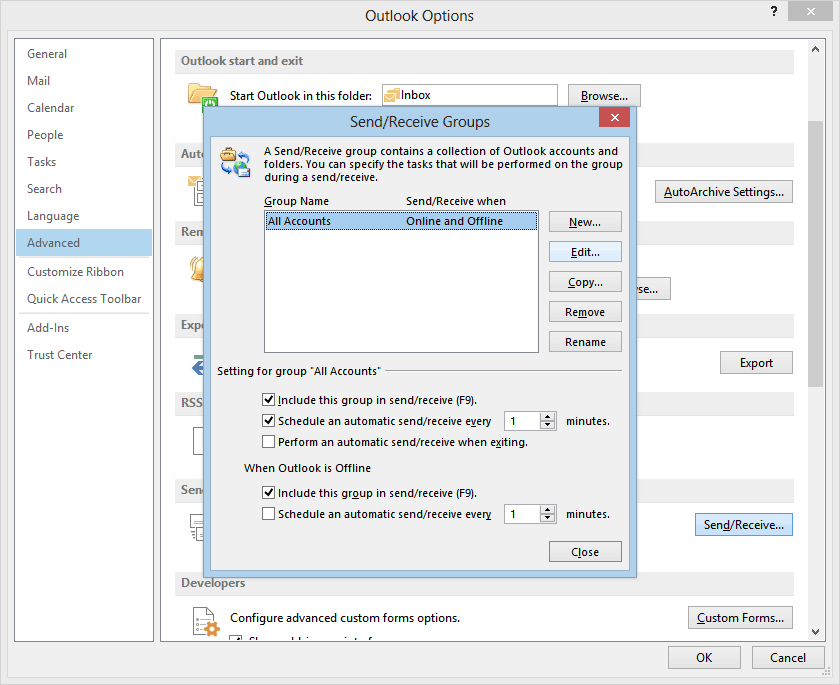
For Outlook 2013 POP3 accounts, the “Download headers only” feature can be accessed from the Outlook File -> Options menu -> Advanced -> Send/Receive -> select your accounts group and click on the Edit button:

On the Folder Options window section, simply select the option “Download headers only”:

We are not sure why Microsoft decided to discard the “Download headers only” option in Outlook 2013, for IMAP accounts. Maybe there were technical / programming reasons, maybe because they push the ActiveSync protocol as a replacement for the IMAP protocol…


Thứ Tư, 16 tháng 4, 2014

Print a customized legend or title - Project

http://office.microsoft.com/en-ca/project-help/print-a-customized-legend-or-title-HA102809399.aspx

Print a customized legend or title

Sometimes the items in a print preview are what you want, but if not, you can customize them. You can even remove the project title or legend.

Here's how you can change which items, like a project title or legend, are included when you print a Gantt chart or Diagram view.

  1. In the Gantt chart view, click Gantt Chart Tools Format > Format > Bar Styles.

  1. To include a bar name in the printed legend, delete the asterisk in front of the name. And if you don't want to print a bar name, just add an asterisk in front the bar's name.

  1. Click File > Print and preview before printing.
  2. To change things like the page orientation, margins, header, footer, legend, or include other items click, File > Print > Page Setup.

For more on setting printing options, see Print a project schedule.

Don't print the legend and title

If you'd rather not include the legend in print, here's how you can hide it:

  1. Click File > Print > Page Setup.
  2. Click Legend, and under Legend on click None.

If you have a header or title but don't want it to print it:

  1. Click File > Print > Page Setup.
  2. Click Header and delete the text.

 Tip   If you want the header but in a different position, you can edit the text, position or change the format.

 Note   Remember that the header you set will be the same on every page, and you can't customize or specify on which page it's included.

Read more about setting up your page for print.

(Chơi cho vui) AIRDROP CHAINGE FINANCE - dự án xây dựng ứng dụng ngân hàng số cho mọi người

 Không hiểu lắm về cái này, tuy nhiên thấy quảng cáo khá nhiều, lại chỉ cung cấp vài thông tin cá nhân (mà mấy ông lớn như facebook với goog...