Thứ Sáu, 15 tháng 3, 2013

C# Crystal Reports Date parameter

http://csharp.net-informations.com/crystal-reports/csharp-crystal-reports-date-parameter.htm

C# Crystal Reports Date parameter

SiteMap
CSharp.Net-Informations.com

The following section describes how to pass a Date parameter field from C# to Crystal Reports.

All C# Crystal Reports Tutorial in this website is based on the following database - crystaldb. So before you begin this section , please take a look at the database structure of crystaldb - Click Here C# crystaldb

If you are new to Crystal Reports and do not know how to create Crystal Reports from C# , please take a look at the section step by step tutorial for creating a Crystal Reports from C#.

In the previous sections , we already saw how to pass a string parameter to Crystal Reports - C# Crystal Reports String Paramater, how to pass an Integer parameter to Crystal Reports - C# Crystal Reports Integer Paramater and get the result. This section is very similar to the previous two sections , so before we begin this section , take a look at the previous two sections.

C# Crystal Reports String Paramater

C# Crystal Reports Integer Paramater

When we pass a Date parameter from C# , we have to create a new date parameter in the Parameter Fields of Field Explorer. Then we will get the following screen and fill the fields like in the picture .
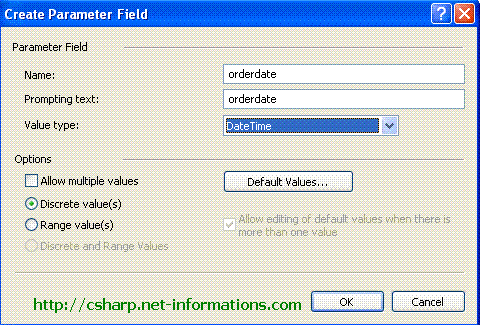
After creating the date parameter field , we have to create the selection formula for the Crystal Reports . For creating selection formula , Right click on Crystal Reports designer window , select REPORT -> SELECTION FORMULA -> RECORD .

Then you can see the record Selection Formula Editor. You can make selection formula from this screen by choosing fields from the lists in the selection formula editor screen.

Here we have three tables selected for report (ordermaster , orderdetails and product ) and we are making the formula like , select all records details from the tables whose order date is greater than the input date parameter. For doing this you have to select Ordermaster.orderdate , a comparison operator and parameter date field from selection list of Formula Editor and make the formula. The following picture shows how to select the fields from formula editor and make the formula. Double click each field then it will automatically selected .
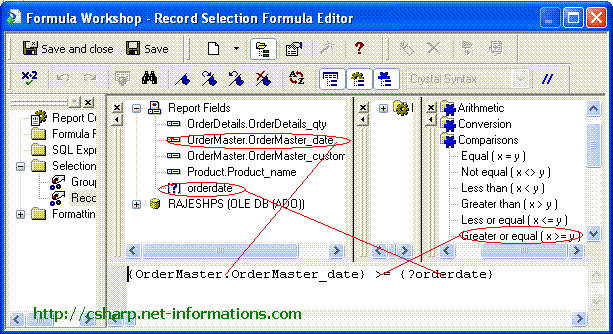
You can close Selection Formula Editor screen after creating the formula.

Now the designing part is over and the next step is to call the Crystal Reports in C# and view it in Crystal Reports Viewer control .

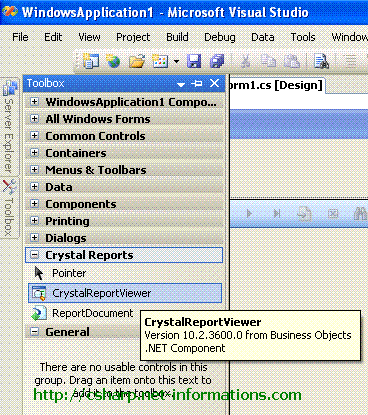
Select the default form (Form1.cs) you created in C# and drag a button and a CrystalReportViewer control to your form .

You have to include CrystalDecisions.CrystalReports.Engine in your C# Source Code.

using CrystalDecisions.CrystalReports.Engine;

using CrystalDecisions.Shared;

Copy and paste the following source code and run your C# project


using System;  using System.Windows.Forms;  using CrystalDecisions.CrystalReports.Engine;  using CrystalDecisions.Shared;    namespace WindowsApplication1  {      public partial class Form1 : Form      {          public Form1()          {              InitializeComponent();          }            private void button1_Click(object sender, EventArgs e)          {              ReportDocument cryRpt = new ReportDocument();              cryRpt.Load("PUT CRYSTAL REPORT PATH HERE\CrystalReport1.rpt");                ParameterFieldDefinitions crParameterFieldDefinitions ;              ParameterFieldDefinition crParameterFieldDefinition ;              ParameterValues crParameterValues = new ParameterValues();              ParameterDiscreteValue crParameterDiscreteValue = new ParameterDiscreteValue();                crParameterDiscreteValue.Value = textBox1.Text;              crParameterFieldDefinitions = cryRpt.DataDefinition.ParameterFields;              crParameterFieldDefinition = crParameterFieldDefinitions["Orderdate"];              crParameterValues = crParameterFieldDefinition.CurrentValues;                crParameterValues.Clear();              crParameterValues.Add(crParameterDiscreteValue);              crParameterFieldDefinition.ApplyCurrentValues(crParameterValues);                crystalReportViewer1.ReportSource = cryRpt;              crystalReportViewer1.Refresh();           }      }  }

cryRpt.Load(PUT CRYSTAL REPORT PATH HERE\\CrystalReport1.rpt");
The Crystal Reports file path in your C# project files location, there you can see CrystalReport1.rpt . So give the full path name of Crystal Reports file like c:\projects\crystalreports\CrystalReport1.rpt

Now you can run the program . Enter any date , then you can see the report whose order date is greater than or equal to the entered date.


Here we got the result of orders whose date is greater than the entered date

C# Crystal Reports from multiple tables

http://csharp.net-informations.com/crystal-reports/csharp-crystal-reports-multiple-tables.htm

C# Crystal Reports from multiple tables

SiteMap
CSharp.Net-Informations.com

The following section describes how to create Crystal Report from multiple tables in C#.

All C# Crystal Reports Tutorial in this website is based on the following database - crystaldb. So before you begin this section , please take a look at the database structure of crystaldb - Click Here C# crystaldb

Here we are going to generate Crystal Reports from multiple tables in C#. Here we have three tables (ordermaster , orderdetails and product ) and we are generating a Crystal Report from these three tables by connecting each table with their related fields.

If you are new to Crystal Reports and do not know how to create Crystal Reports from C# , please take a look at the section step by step tutorial for creating a Crystal Reports from C#.

Hope you understand the basics of generating a Crystal Reports in C# , this section is the continuation of the first part, so here we avoid some basic steps and start from the table selection of Crystal Reports.

Select all table from the table list to right side list box, because we are creating report from three tables ( OrderMaster, OrderDetails, Product) . If you don't know up to this part of the tutorial , refer previous tutorial for up to selecting databese for Crystal reports.

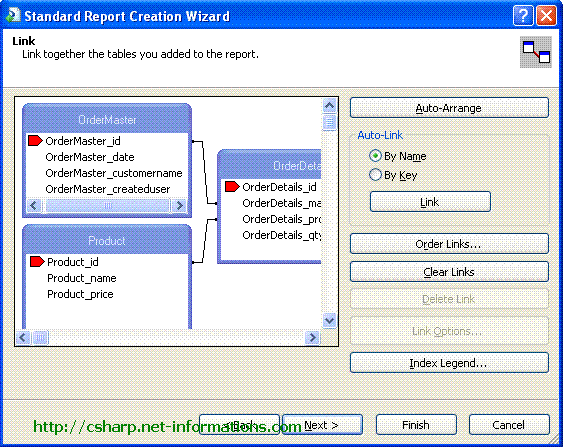
The next step is to make relations between these selected tables. Here we are connecting the related fields from each table. For that we arrange the tables in visible area in the list (this is not necessary ) and select the fields that we want to make relation and drag to the related field of the other selected tables. After made the relations with tables the screen is look like the following picture .

Next step is to select the fields from the selected tables ( OrderMaster, OrderDetails, Product) . Here we are selecting the fields Customername , orderdate from ordermastertable , Productname from product table and quantity from order details table. The field selection screen is look like the following picture .

After select the fields from tables, click the Finish button because now we are not using any other functionalities of the Crystal Reports wizard. After that you will get the Crystal Reports designer window . You can arrange the fields in the designer window according to your requirement to view the report .

For re-arranging fields in the designer window , you can drag the field object on the screen . For editing right click the field object and select Edit Text Object. The following picture shows the sample of designer window after rearrange the field.

Now the designing part is over and the next step is to call the Crystal Reports in C# and view it in Crystal Reports Viewer control .

Select the default form (Form1.cs) you created in C# and drag a button and a CrystalReportViewer control to your form .

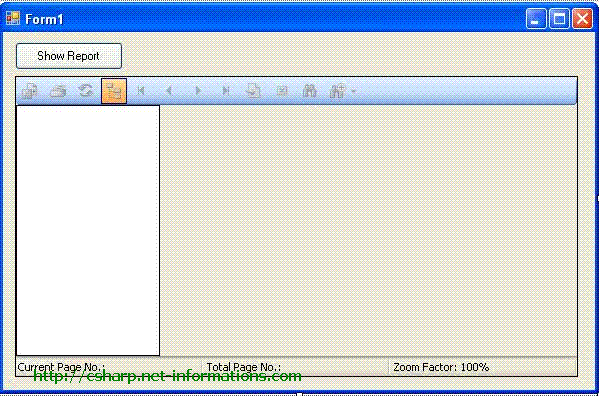
After you drag the CrystalReportViewer to your form , it will look like the following picture.

You have to include CrystalDecisions.CrystalReports.Engine in your C# Source Code.

using CrystalDecisions.CrystalReports.Engine;

Copy and paste the following source code and run your C# project


using System;  using System.Windows.Forms;  using CrystalDecisions.CrystalReports.Engine;    namespace WindowsApplication1  {      public partial class Form1 : Form      {          public Form1()          {              InitializeComponent();          }            private void button1_Click(object sender, EventArgs e)          {              ReportDocument cryRpt = new ReportDocument();              cryRpt.Load(PUT CRYSTAL REPORT PATH HERE\\CrystalReport1.rpt");              crystalReportViewer1.ReportSource = cryRpt;              crystalReportViewer1.Refresh();          }      }  }

NOTES:
cryRpt.Load(PUT CRYSTAL REPORT PATH HERE\\CrystalReport1.rpt");

The Crystal Reports file path in your C# project files location, there you can see CrystalReport1.rpt . So give the full path name of Crystal Reports file like c:\projects\crystalreports\CrystalReport1.rpt

After you run the source code you will get the report like this.


When you click the button, the application will ask the username and password. Later in this tutorial you can find how to avoid asking username and password - C# Dynamic logon parameters in Crystal Reports.

C# Crystal Reports Export to Pdf

http://csharp.net-informations.com/crystal-reports/csharp-crystal-reports-export-pdf.htm

C# Crystal Reports Export to Pdf

SiteMap
CSharp.Net-Informations.com

There are situations when we want to export Crystal reports to .pdf format programmatically. In these situations we can use ExportOptions for export the Crystal Reports to .pdf format. Also we have to set PdfRtfWordFormatOptions and ExportFormatType.PortableDocFormat . In the following example you can see how to export a Crystal Reports as a PDF format file in C#.

All C# Crystal Reports Tutorial in this website is based on the following database - crystaldb. So before you begin this section , please take a look at the database structure of crystaldb - Click Here C# crystaldb

If you are new to Crystal Reports and do not know how to create Crystal Reports from C# , please take a look at the section step by step tutorial for creating a Crystal Reports from C#.

In this section we are using our earlier program step by step tutorial for creating a Crystal Reports from C# for pull data from database to Crystal Reports . Before we start this section take a look at the step by step tutorial for creating a Crystal Reports from C# .

Here we are making a Crystal Report from Product table and export the report content to a PDF format file.

Select the default form (Form1.cs) you created in C# and drag two buttons (Button1, Button2 ) and a CrystalReportViewer control to your form.

You have to include CrystalDecisions.CrystalReports.Engine in your C# Source Code.

using CrystalDecisions.CrystalReports.Engine;

using CrystalDecisions.Shared;

Copy and paste the following source code and run your C# project


using System;  using System.Windows.Forms;  using CrystalDecisions.CrystalReports.Engine;  using CrystalDecisions.Shared;    namespace WindowsApplication1  {      public partial class Form1 : Form      {          ReportDocument cryRpt;            public Form1()          {              InitializeComponent();          }            private void button1_Click(object sender, EventArgs e)          {              cryRpt = new ReportDocument();              cryRpt.Load(PUT CRYSTAL REPORT PATH HERE\\CrystalReport1.rpt");              crystalReportViewer1.ReportSource = cryRpt;              crystalReportViewer1.Refresh();           }            private void button2_Click(object sender, EventArgs e)          {              try              {                  ExportOptions CrExportOptions ;                  DiskFileDestinationOptions CrDiskFileDestinationOptions = new DiskFileDestinationOptions();                  PdfRtfWordFormatOptions CrFormatTypeOptions = new PdfRtfWordFormatOptions();                  CrDiskFileDestinationOptions.DiskFileName = "c:\\csharp.net-informations.pdf";                  CrExportOptions = cryRpt.ExportOptions;                  {                      CrExportOptions.ExportDestinationType = ExportDestinationType.DiskFile;                      CrExportOptions.ExportFormatType = ExportFormatType.PortableDocFormat;                      CrExportOptions.DestinationOptions = CrDiskFileDestinationOptions;                      CrExportOptions.FormatOptions = CrFormatTypeOptions;                  }                  cryRpt.Export();              }              catch (Exception ex)              {                  MessageBox.Show(ex.ToString());              }          }      }  }

cryRpt.Load(PUT CRYSTAL REPORT PATH HERE\\CrystalReport1.rpt");
The Crystal Reports file path in your C# project files location, there you can see CrystalReport1.rpt . So give the full path name of Crystal Reports file like c:\projects\crystalreports\CrystalReport1.rpt

When you run this program you will get the PDF file (csharp.net-informations.pdf) in your computer's C:

C# Crystal Reports Summary Field

http://csharp.net-informations.com/crystal-reports/csharp-crystal-reports-summary-field.htm

C# Crystal Reports Summary Field

SiteMap
CSharp.Net-Informations.com

The following C# - Crystal Reports section describes how to add a summary field in the Crystal Reports .

All C# Crystal Reports Tutorial in this website is based on the following database - crystaldb. So before you begin this section , please take a look at the database structure of crystaldb - Click Here C# crystaldb

If you are new to Crystal Reports and do not know how to create Crystal Reports from C# , please take a look at the section step by step tutorial for creating a Crystal Reports from C#.

This section is the continuation of the previous tutorial C# Crystal Reports Formula Field . So before we start this tutorial , take a look at the previous tutorial C# Crystal Reports Formula Field .

Hope you already gone through the previous section C# Crystal Reports Formula Field. Here in this section we are calculating the grand total of the Formula Field - Total . The Total field is a Formula field, the result of qty X price .

In the Crystal Reports designer view window, right click on the Report Footer , just below the Total field and select Insert -> Summary .

Then you will get a screen , select the Total from the combo box and select Sum from next Combo Box , and summary location Grand Total (Report Footer) . Click Ok button

Now you can see @Total is just below the Total field in the report Footer.

Now the designing part is over and the next step is to call the Crystal Reports in C# and view it in Crystal Reports Viewer control .

Select the default form (Form1.cs) you created in C# and drag a button and a CrystalReportViewer control to your form .

You have to include CrystalDecisions.CrystalReports.Engine in your C# Source Code.

using CrystalDecisions.CrystalReports.Engine;

using CrystalDecisions.Shared;

Copy and paste the following source code and run your C# project


using System;  using System.Windows.Forms;  using CrystalDecisions.CrystalReports.Engine;    namespace WindowsApplication1  {      public partial class Form1 : Form      {          public Form1()          {              InitializeComponent();          }            private void button1_Click(object sender, EventArgs e)          {              ReportDocument cryRpt = new ReportDocument();              cryRpt.Load(PUT CRYSTAL REPORT PATH HERE\\CrystalReport1.rpt");              crystalReportViewer1.ReportSource = cryRpt;              crystalReportViewer1.Refresh();          }      }  }

cryRpt.Load(PUT CRYSTAL REPORT PATH HERE\\CrystalReport1.rpt");
The Crystal Reports file path in your C# project files location, there you can see CrystalReport1.rpt . So give the full path name of Crystal Reports file like c:\projects\crystalreports\CrystalReport1.rpt

When you run this program your screen will look like the following picture.

C# Crystal Reports Export to Excel

http://csharp.net-informations.com/crystal-reports/csharp-crystal-reports-export-excel.htm

C# Crystal Reports Export to Excel

SiteMap
CSharp.Net-Informations.com

There are situations when we want to export Crystal reports to .xls format programmatically in C#. In these situations we can use ExportOptions for export the Crystal Reports to .xls format. Also we have to set ExcelFormatOptions and ExportFormatType.Excel . In the following example you can see how to export a Crystal Reports as a Excel format file.

All C# Crystal Reports Tutorial in this website is based on the following database - crystaldb. So before you begin this section , please take a look at the database structure of crystaldb - Click Here C# crystaldb

If you are new to Crystal Reports and do not know how to create Crystal Reports from C# , please take a look at the section step by step tutorial for creating a Crystal Reports from C#.

In this section we are using our earlier program step by step tutorial for creating a Crystal Reports from C# for pull data from database to Crystal Reports . Before we start this section take a look at the step by step tutorial for creating a Crystal Reports from C# .

Here we are generating a Crystal Report from Product table and export the report content to an Excel format file.

Select the default form (Form1.cs) you created in C# and drag two buttons (Button1, Button2 ) and a CrystalReportViewer control to your form.

You have to include CrystalDecisions.CrystalReports.Engine in your C# Source Code.

using CrystalDecisions.CrystalReports.Engine;

using CrystalDecisions.Shared;

Copy and paste the following source code and run your C# project


using System;  using System.Windows.Forms;  using CrystalDecisions.CrystalReports.Engine;  using CrystalDecisions.Shared;    namespace WindowsApplication1  {      public partial class Form1 : Form      {          ReportDocument cryRpt;            public Form1()          {              InitializeComponent();          }            private void button1_Click(object sender, EventArgs e)          {              cryRpt = new ReportDocument();              cryRpt.Load(PUT CRYSTAL REPORT PATH HERE\\CrystalReport1.rpt");              crystalReportViewer1.ReportSource = cryRpt;              crystalReportViewer1.Refresh();           }            private void button2_Click(object sender, EventArgs e)          {              try              {                  ExportOptions CrExportOptions ;                                      DiskFileDestinationOptions CrDiskFileDestinationOptions = new DiskFileDestinationOptions();                  ExcelFormatOptions CrFormatTypeOptions = new ExcelFormatOptions();                  CrDiskFileDestinationOptions.DiskFileName = "c:\\csharp.net-informations.xls";                  CrExportOptions = cryRpt.ExportOptions;                  CrExportOptions.ExportDestinationType = ExportDestinationType.DiskFile;                  CrExportOptions.ExportFormatType = ExportFormatType.Excel;                  CrExportOptions.DestinationOptions = CrDiskFileDestinationOptions;                  CrExportOptions.FormatOptions = CrFormatTypeOptions;                  cryRpt.Export();              }              catch (Exception ex)              {                  MessageBox.Show(ex.ToString());              }          }      }  }

cryRpt.Load(PUT CRYSTAL REPORT PATH HERE\\CrystalReport1.rpt");
The Crystal Reports file path in your project files location, there you can see CrystalReport1.rpt . So give the full path name of Crystal Reports file like c:\projects\crystalreports\CrystalReport1.rpt

When you run this program you will get the Excel file (csharp.net-informations.xls) in your computer's C:

Email Crystal Reports from C# Application

http://csharp.net-informations.com/crystal-reports/csharp-crystal-reports-email.htm

Email Crystal Reports from C# Application

SiteMap
CSharp.Net-Informations.com

The following program describes how to email a Crystal Reports from C# .

All C# Crystal Reports Tutorial in this website is based on the following database - crystaldb. So before you begin this section , please take a look at the database structure of crystaldb - Click Here C# crystaldb

If you are new to Crystal Reports and do not know how to create Crystal Reports from C# , please take a look at the section step by step tutorial for creating a Crystal Reports from C#.

For email a Crystal Report from C# first we have to export the Crystal Reports in any of the File Format available in Crystal Reports and then Email it.

In this section we use the previous tutorial C# Crystal Reports Export to PDF file . So before we start this section please take a look at the tutorial C# Crystal Reports Export to PDF file.

After export the Crystal Reports as a PDF file format in your disk , the next step is to email that .pdf file . For that here we are using System.Web.Mail of C# . We have to provide the necessary information to configuring SmtpMail client and send the exported file as attachment .

Select the default form (Form1.cs) you created in C# and drag two buttons (Button1, Button2 ) and a CrystalReportViewer control to your form.

You have to include CrystalDecisions.CrystalReports.Engine in your C# Source Code.

using CrystalDecisions.CrystalReports.Engine;

using CrystalDecisions.Shared;

using System.Web.Mail

Copy and paste the following source code and run your C# project


using System;  using System.Windows.Forms;  using CrystalDecisions.CrystalReports.Engine;  using CrystalDecisions.Shared;  using System.Web.Mail;    namespace WindowsApplication1  {      public partial class Form1 : Form      {          ReportDocument cryRpt;          string pdfFile = "c:\\csharp.net-informations.pdf";            public Form1()          {              InitializeComponent();          }            private void button1_Click(object sender, EventArgs e)          {              cryRpt = new ReportDocument();              cryRpt.Load(PUT CRYSTAL REPORT PATH HERE\\CrystalReport1.rpt");              crystalReportViewer1.ReportSource = cryRpt;              crystalReportViewer1.Refresh();           }            private void button2_Click(object sender, EventArgs e)          {              try              {                  ExportOptions CrExportOptions ;                  DiskFileDestinationOptions CrDiskFileDestinationOptions = new DiskFileDestinationOptions();                  PdfRtfWordFormatOptions CrFormatTypeOptions = new PdfRtfWordFormatOptions();                  CrDiskFileDestinationOptions.DiskFileName = pdfFile;                  CrExportOptions = cryRpt.ExportOptions;                  CrExportOptions.ExportDestinationType = ExportDestinationType.DiskFile;                  CrExportOptions.ExportFormatType = ExportFormatType.PortableDocFormat;                  CrExportOptions.DestinationOptions = CrDiskFileDestinationOptions;                  CrExportOptions.FormatOptions = CrFormatTypeOptions;                  cryRpt.Export();                    sendmail();              }              catch (Exception ex)              {                  MessageBox.Show(ex.ToString());              }          }            private void sendmail()          {              try {                  SmtpMail.SmtpServer.Insert(0, "your hostname");                  MailMessage Msg = new MailMessage();                  Msg.To = "to address here";                  Msg.From = "from address here";                  Msg.Subject = "Crystal Report Attachment ";                  Msg.Body = "Crystal Report Attachment ";                  Msg.Attachments.Add(new MailAttachment(pdfFile));                  System.Web.Mail.SmtpMail.Send(Msg);              }               catch (Exception ex) {                   MessageBox.Show (ex.ToString());               }                   }      }  }

cryRpt.Load(PUT CRYSTAL REPORT PATH HERE\\CrystalReport1.rpt");
The Crystal Reports file path in your C# project files location, there you can see CrystalReport1.rpt . So give the full path name of Crystal Reports file like c:\projects\crystalreports\CrystalReport1.rpt

Before you run this program , you have to provide the necessary SMTP information , that is your HOSTNAME , FROM ADDRESS and TO ADDRESS to the SMTP client.

How to Crystal Report Merge Module

http://csharp.net-informations.com/crystal-reports/csharp-crystal-merge-module.htm

BCT:
- Tạm thời chưa dùng đến cách này
- Hiện đang sử dụng chức năng Prerequisites khi đóng gói phần mềm bằng VS 2008


How to Crystal Report Merge Module

SiteMap
CSharp.Net-Informations.com

The following section shows how to create a setup file for Crystal Reports Client side installations using Merge Modules.

If you are new to Crystal Reports and do not know how to create Crystal Reports from C# , please take a look at the section step by step tutorial for creating a Crystal Reports from C#.

In the previous section How to install C# Crystal Reports on Clinet machine , we already saw how to deploy a Crystal Reports components and assemblies on the target machine using CRRedist2005_x86.msi file. Here we are creating a separate setup file for client side installations using Crystal Report Merge Modules.

Crystal Reports uses merge modules to ensure the correct report components and assemblies are installed with your deployment of C# project. A merge module is a set of components that are merged with a Windows installer for applications that need them. The following steps are creating a setup file for Crystal Reports Client side installation using Merge Modules.

Before creating a setup project, make sure that the following files exist in the \Program Files\Common Files\Merge Modules folder.

  CrystalReportsRedist2005_x86.msm    Microsoft_VC80_ATL_x86.msm  

policy_8_0_Microsoft_VC80_ATL_x86.msm

Steps to create Setup file for your C# Application.

1) Make sure the above mentioned files are in the \Program Files\Common Files\Merge Modules folder , If the files are not there you can download the file and copy it to the folder \Program Files\Common Files\Merge Modules .

Download: https://www.sdn.sap.com/irj/scn/weblogs?blog=/pub/wlg/11688

2) Open your Visual Studio

3) Select "New Project" from File menu.

4) Select "Setup and Deployment" from "Other Project Types"

5) In the "Solution Explorer", select your setup project, right-click, and select Add and Merge Module from the menu.

6) Select CrystalReportsRedist2005_x86.msm to your setup project.

The file available at \Program Files\Common Files\Merge Modules

Then you can see Microsoft_VC80_ATL_x86.msm and policy_8_0_Microsoft_VC80_ATL_x86.msm will be automatically added in the Detected Decencies section.

7) Build your project.

Now you will get the setup file for distribution. Either you can add this setup file to your C# application installer or distribute it as a separate setup file.

(Chơi cho vui) AIRDROP CHAINGE FINANCE - dự án xây dựng ứng dụng ngân hàng số cho mọi người

 Không hiểu lắm về cái này, tuy nhiên thấy quảng cáo khá nhiều, lại chỉ cung cấp vài thông tin cá nhân (mà mấy ông lớn như facebook với goog...